
Oracle EBS Database Upgrade from 12c to 19c Part-2

Oracle EBS Database Upgrade from 12c to 19c Part-2
This post is a continuation of the previous article on Oracle EBS Database Upgrade from 12c to 19c Part-1. Here, we will delve into the remaining part of the database upgrade process from 12c to 19c. Let’s begin with Section 6, building upon Section 5 discussed in the last post.
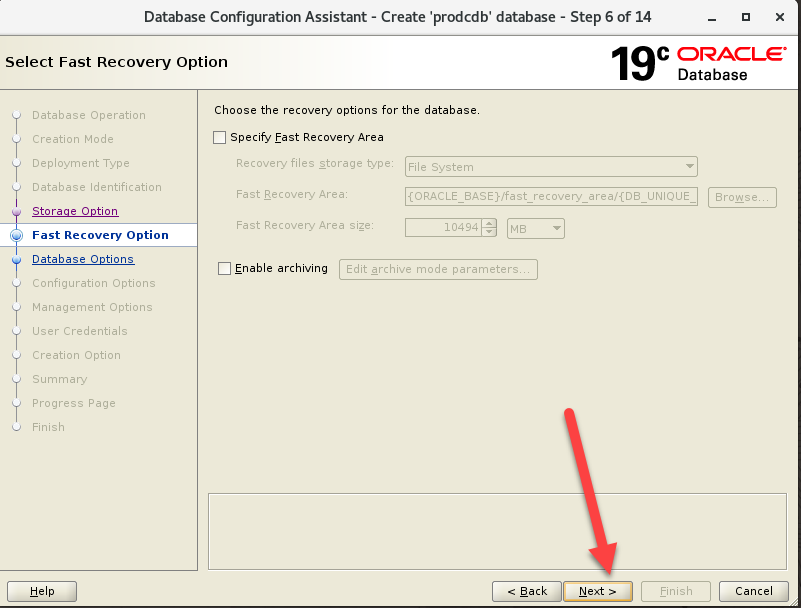
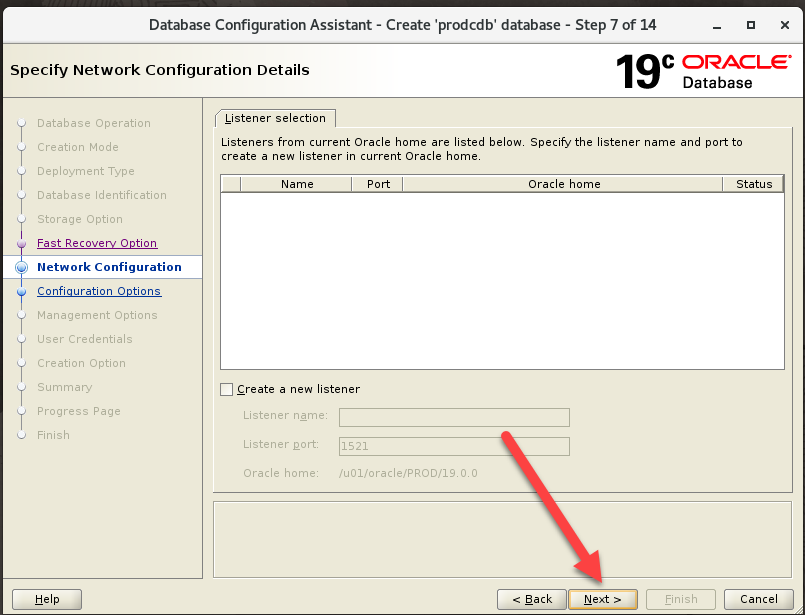
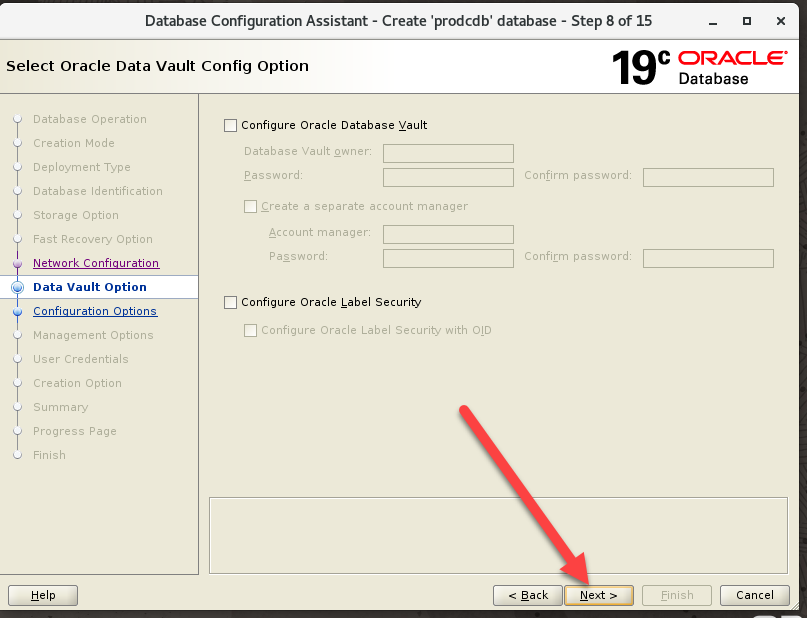
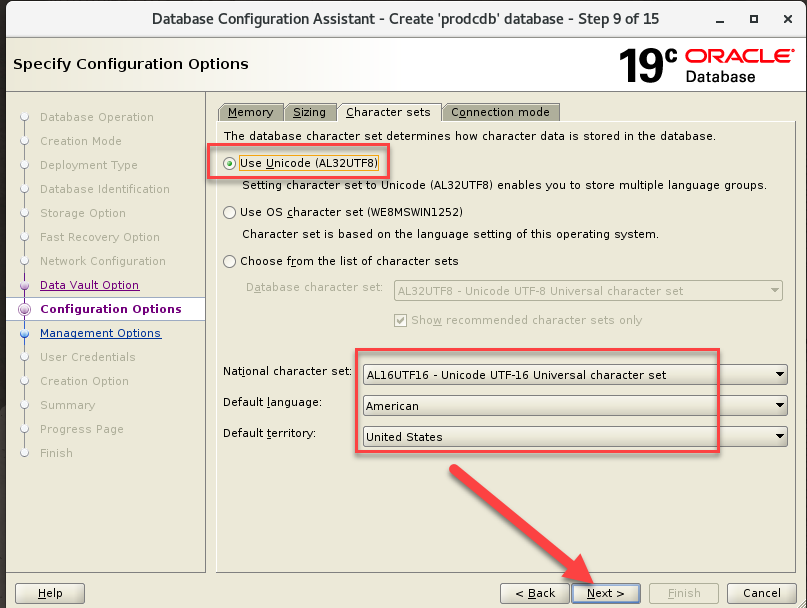
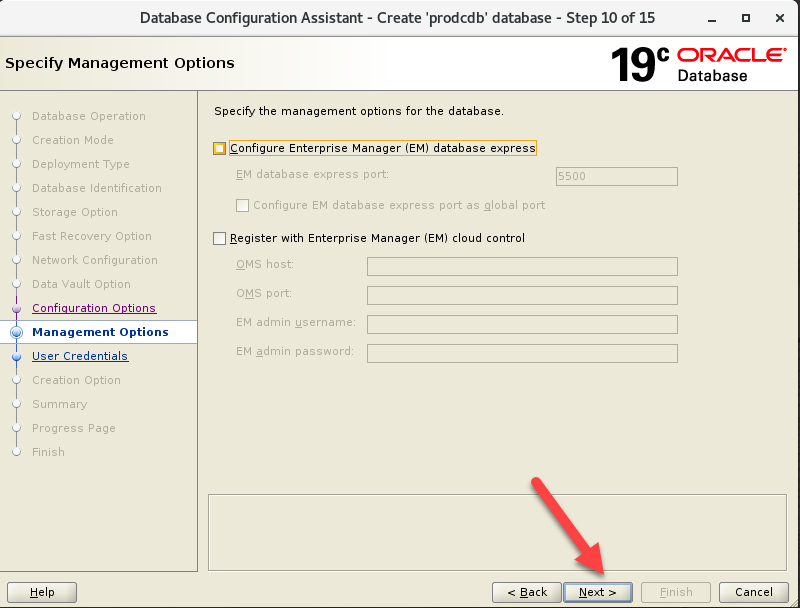
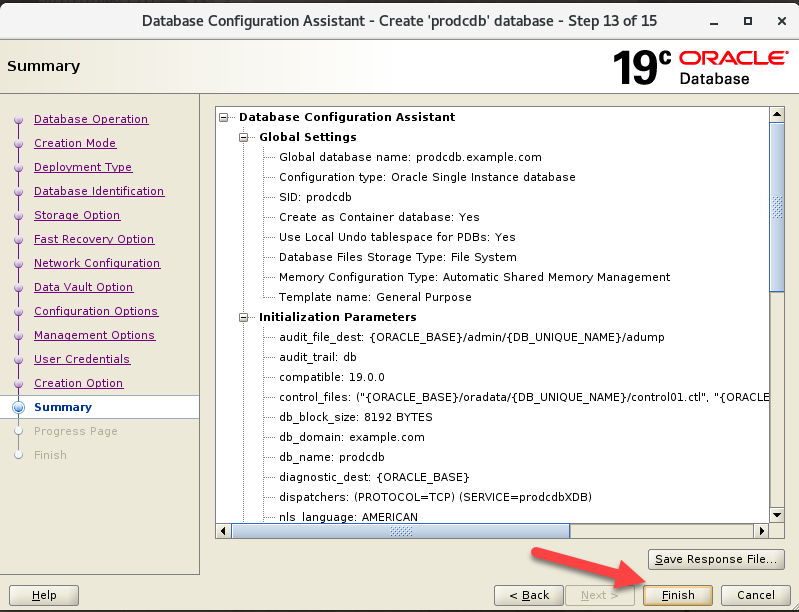
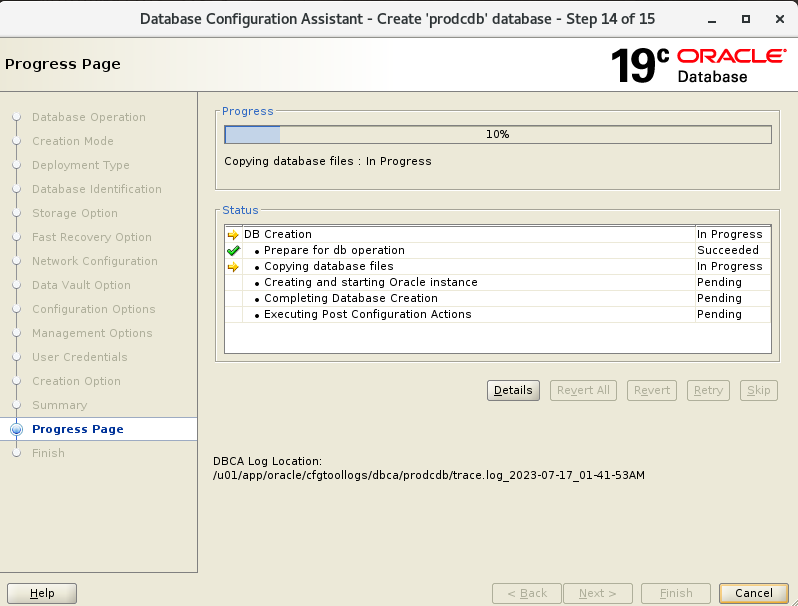
Section 6 – Create the CDB through DBCA
Step 1. Create the CDB
|
On the database server node Source 19c environment and run below from GUI Terminal/VNC
|
[oracle@test1 ~]$ . ./19c.env
[oracle@test1 ~]$ cd $ORACLE_HOME/bin
[oracle@test1 bin]$ ./dbca
|
 |
|
 |
|
 |
|
 |
|
 |
|
 |
|
 |
|
 |
|
 |
|
 |
|
 |
|
 |
|
 |
|
 |
|
Database Creation Process Starts |
 |
|
 |
Step 2. Run DataPatch on the CDB
Use the following commands to load any necessary patches on the CDB.
Source 19 environment File
|
[oracle@test1 ~]$ . ./19c.env [oracle@test1 ~]$ export ORACLE_SID=prodcdb [oracle@test1 ~]$ $ORACLE_HOME/OPatch/datapatch SQL Patching tool version 19.19.0.0.0 Production on Mon Jul 17 03:01:50 2023 Copyright (c) 2012, 2023, Oracle. All rights reserved. Log file for this invocation: /u01/app/oracle/cfgtoollogs/sqlpatch/sqlpatch_29132_2023_07_17_03_01_50/ sqlpatch_invocation.log Connecting to database…OK Gathering database info…done
Note: Datapatch will only apply or rollback SQL fixes for PDBs that are in an open state, no patches will be applied to closed PDBs. Please refer to Note: Datapatch: Database 12c Post Patch SQL Automation (Doc ID 1585822.1) Bootstrapping registry and package to current versions…done Determining current state…done Current state of interim SQL patches: Interim patch 35050341 (OJVM RELEASE UPDATE: 19.19.0.0.230418 (35050341)): Binary registry: Installed PDB CDB$ROOT: Applied successfully on 17-JUL-23 02.35.23.436147 AM PDB PDB$SEED: Applied successfully on 17-JUL-23 02.47.06.787785 AM Interim patch 35406065 (RESTORE DATABASE PREVIEW FAILING WITH RMAN-00600 [7004] [0] [KRMR_GET_ARCHIVED_NEXT_SCN_ALSCN] AFTER): Binary registry: Installed PDB CDB$ROOT: Applied successfully on 17-JUL-23 02.35.23.546590 AM PDB PDB$SEED: Applied successfully on 17-JUL-23 02.47.06.898928 AM Current state of release update SQL patches: Binary registry: 19.19.0.0.0 Release_Update 230322020406: Installed PDB CDB$ROOT: Applied 19.19.0.0.0 Release_Update 230322020406 successfully on 17-JUL-23 02.35.23.428107 AM PDB PDB$SEED: Applied 19.19.0.0.0 Release_Update 230322020406 successfully on 17-JUL-23 02.47.06.781113 AM Adding patches to installation queue and performing prereq checks…done Installation queue: For the following PDBs: CDB$ROOT PDB$SEED No interim patches need to be rolled back No release update patches need to be installed No interim patches need to be applied SQL Patching tool complete on Mon Jul 17 03:02:14 2023 |
Step 3. Create the CDB MGDSYS schema
Use SQL*Plus to connect to the CDB as SYSDBA and run the $ORACLE_HOME/rdbms/admin/catmgd.sql script. This creates the new MGDSYS schema on the CDB
Source 19c Environment
|
[oracle@test1 ~]$ . ./19c.env [oracle@test1 ~]$ sqlplus ‘/as sysdba’ SQL*Plus: Release 19.0.0.0.0 – Production on Mon Jul 17 03:04:08 2023 Version 19.19.0.0.0 Copyright (c) 1982, 2022, Oracle. All rights reserved. Connected to: Oracle Database 19c Enterprise Edition Release 19.0.0.0.0 – Production Version 19.19.0.0.0 SQL> @$ORACLE_HOME/rdbms/admin/catmgd.sql This creates the new MGDSYS schema on the CDB. |
Step 4. Create the CDB TNS files
|
On the database server node, run the following perl script to generate the required TNS files. Note that this script does not create a listener. $ cd $ORACLE_HOME/appsutil$ . ./txkSetCfgCDB.env dboraclehome=<full path of ORACLE_HOME> $ cd $ORACLE_HOME/appsutil/bin $ perl txkGenCDBTnsAdmin.pl -dboraclehome=<ORACLE_HOME> -cdbname=<CDB SID> -cdbsid=<CDB SID> -dbport=<Database port> -outdir=<ORACLE_HOME>/appsutil/log |
|
[oracle@test1 ~]$ . ./19c.env [oracle@test1 ~]$ cd $ORACLE_HOME/appsutil [oracle@test1 appsutil]$ . ./txkSetCfgCDB.env dboraclehome=$ORACLE_HOME Oracle Home being passed: /u01/oracle/PROD/19.0.0 [oracle@test1 appsutil]$ cd $ORACLE_HOME/appsutil/bin [oracle@test1 bin]$ perl txkGenCDBTnsAdmin.pl -dboraclehome=$ORACLE_HOME -cdbname=prodcdb -cdbsid=prodcdb -dbport=1522 -outdir=$ORACLE_HOME/appsutil/log Script Name : txkGenCDBTnsAdmin.pl Script Version : 120.0.12020000.11 Started : Mon Jul 17 03:10:02 PKT 2023 Log File : /u01/oracle/PROD/19.0.0/appsutil/log/ TXK_CDB_TNS_ADMIN_Mon_Jul_17_03_10_02_2023/txkGenCDBTnsAdmin.log ———– Values used ———– Database Oracle Home : /u01/oracle/PROD/19.0.0 CDB NAME : prodcdb CDB SID : prodcdb Database port : 1522 OUT Directory : /u01/oracle/PROD/19.0.0/appsutil/log Is RAC? : No Virtual Hostname : Logical Hostname : Script execution mode : generate ========================= Validating oracle home… ========================= Oracle Home: /u01/oracle/PROD/19.0.0 exists. =========================== Validating out directory… =========================== Out directory: /u01/oracle/PROD/19.0.0/appsutil/log exists. =================================== Validating script execution mode… =================================== Script execution mode: generate Script execution mode is valid. ============================ Inside getDBHostDetails()… ============================ DB Hostname : test1 DB Domain : example.com Logical hostname is not passed, hence using physical hostname details. Logical Hostname : test1 Logical Domain : example.com ===================== Inside getDBPort()… ===================== DB Port passed as an argument, using the same. DB Port: 1522 ====================================== Inside generateCDBTNSAdminContent()… ====================================== Creating the directory: /u01/oracle/PROD/19.0.0/appsutil/log/ TXK_CDB_TNS_ADMIN_Mon_Jul_17_03_10_02_2023/tns_admin_cdb_bkp Creating the directory: /u01/oracle/PROD/19.0.0/appsutil/log/ TXK_CDB_TNS_ADMIN_Mon_Jul_17_03_10_02_2023/tns_admin_cdb_temp listener_template: listener_ora_cdb_db19.tmp sqlnet_template: sqlnet_ora_cdb_db19.tmp Copying the file —————- SOURCE : /u01/oracle/PROD/19.0.0/appsutil/template/listener_ora_cdb_db19.tmp TARGET : /u01/oracle/PROD/19.0.0/appsutil/log/TXK_CDB_TNS_ADMIN_Mon_Jul_17_03_10_02_2023 /tns_admin_cdb_temp/listener.ora =================================== Inside replaceContextVariables()… =================================== File /u01/oracle/PROD/19.0.0/network/admin/listener.ora does not exist. Copying the file —————- SOURCE : /u01/oracle/PROD/19.0.0/appsutil/log/TXK_CDB_TNS_ADMIN_Mon_Jul_17_03_10_02_2023 /tns_admin_cdb_temp/listener.ora TARGET : /u01/oracle/PROD/19.0.0/network/admin/listener.ora Copying the file —————- SOURCE : /u01/oracle/PROD/19.0.0/appsutil/template/tnsnames_ora_cdb_db121.tmp TARGET : /u01/oracle/PROD/19.0.0/appsutil/log/TXK_CDB_TNS_ADMIN_Mon_Jul_17_03_10_02_2023 /tns_admin_cdb_temp/tnsnames.ora =================================== Inside replaceContextVariables()… =================================== File /u01/oracle/PROD/19.0.0/network/admin/tnsnames.ora does not exist. Copying the file —————- SOURCE : /u01/oracle/PROD/19.0.0/appsutil/log/TXK_CDB_TNS_ADMIN_Mon_Jul_17_03_10_02_2023 /tns_admin_cdb_temp/tnsnames.ora TARGET : /u01/oracle/PROD/19.0.0/network/admin/tnsnames.ora Copying the file —————- SOURCE : /u01/oracle/PROD/19.0.0/appsutil/template/sqlnet_ora_cdb_db19.tmp TARGET : /u01/oracle/PROD/19.0.0/appsutil/log/TXK_CDB_TNS_ADMIN_Mon_Jul_17_03_10_02_2023 /tns_admin_cdb_temp/sqlnet.ora =================================== Inside replaceContextVariables()… =================================== File /u01/oracle/PROD/19.0.0/network/admin/sqlnet.ora does not exist. Copying the file —————- SOURCE : /u01/oracle/PROD/19.0.0/appsutil/log/TXK_CDB_TNS_ADMIN_Mon_Jul_17_03_10_02_2023 /tns_admin_cdb_temp/sqlnet.ora TARGET : /u01/oracle/PROD/19.0.0/network/admin/sqlnet.ora ============================== Inside updateCDBSqlNetOra()… ============================== Updating the IFILE entry… Exiting from the script. Ended: Mon Jul 17 03:10:02 PKT 2023 |
Step 5. Shut down the CDB
Source 19c environment file and Use SQL*Plus to connect to the CDB as SYSDBA and use the following command to shut down the database:
|
[oracle@test1 bin]$ sqlplus / as sysdba SQL*Plus: Release 19.0.0.0.0 – Production on Mon Jul 17 03:12:11 2023 Version 19.19.0.0.0 Copyright (c) 1982, 2022, Oracle. All rights reserved. Connected to: Oracle Database 19c Enterprise Edition Release 19.0.0.0.0 – Production Version 19.19.0.0.0 SQL> shutdown immediate; Database closed. Database dismounted. ORACLE instance shut down. |
Section 7 – Preparing DB Upgrade
Step 1. Complete the patching cycle and remove ADOP-created editions
As the owner of the source administration server, execute any of the following commands that have not been executed before. This action will remove any editions that were created during previous adop patching cycles, thereby cleaning up the environment. Additionally, these commands will finalize any pending patching cycles that are still open.
On Application Tier source run file system environment
|
[oracle@test1 ~]$ . ./EBSapps.env run E-Business Suite Environment Information —————————————- RUN File System : /u01/oracle/PROD/fs2/EBSapps/appl PATCH File System : /u01/oracle/PROD/fs1/EBSapps/appl Non-Editioned File System : /u01/oracle/PROD/fs_ne DB Host: test1.example.com Service/SID: PROD Sourcing the RUN File System … |
$ adop phase=prepare
$ adop phase=actualize_all
$ adop phase=finalize finalize_mode=full
$ adop phase=cutover mtrestart=no
Note: The steps mentioned above may require a significant amount of time to complete. Therefore, it is advised to relax and monitor the progress during this period.
Source the Environment Again On the new run file system
|
oracle@test1 ~]$ . ./EBSapps.env run E-Business Suite Environment Information —————————————- RUN File System : /u01/oracle/PROD/fs2/EBSapps/appl PATCH File System : /u01/oracle/PROD/fs1/EBSapps/appl Non-Editioned File System : /u01/oracle/PROD/fs_ne DB Host: test1.example.com Service/SID: PROD Sourcing the RUN File System … |
$ adop phase=cleanup cleanup_mode=full
These maintenance operations will have a significantly longer duration compared to a typical online patching cycle. Therefore, it is recommended to perform them only when there is no urgent requirement to initiate a new online patching cycle.
The applications will be unavailable to users until all remaining tasks are completed.
You Can monitor the above process through ADOPMON
|
[oracle@test1 PROD]$ adopmon Running script. Press Ctrl-C to quit. Enter the APPS password: Validating credentials… Printing the log statements starting from sequence #702651 Timestamp Node name Message Type Message Text ————————————————————————————————————————— 2023/07/17 17:30:38 test1 EVENT Drop covered objects, pass #11 complete, dropped: 122, errors: 0 2023/07/17 17:31:03 test1 EVENT Drop covered objects, pass #12 complete, dropped: 52, errors: 0 2023/07/17 17:31:19 test1 EVENT Drop covered objects, pass #13 complete, dropped: 15, errors: 0 2023/07/17 17:31:35 test1 EVENT Drop covered objects, pass #14 complete, dropped: 1, errors: 0 2023/07/17 17:31:47 test1 EVENT Drop covered objects, pass #15 complete, dropped: 0, errors: 0 2023/07/17 17:31:47 test1 EVENT Drop Covered Objects – alternate method 2023/07/17 17:32:10 test1 EVENT Cleanup crossedition triggers 2023/07/17 17:32:11 test1 EVENT Cleanup unused columns 2023/07/17 17:33:04 EVENT Drop Edition: “ORA$BASE” 2023/07/17 18:25:51 EVENT Drop Edition: “V_20230716_1415” 2023/07/17 18:25:55 test1 EVENT Generating log report. 2023/07/17 18:25:55 test1 EVENT Output: /u01/oracle/PROD/fs_ne/EBSapps /log/adop/8/20230717_144033/clea nup/test1/adzdshowlog.out 2023/07/17 18:25:56 test1 EVENT The cleanup phase completed successfully. |
Step 2. Store the UTL_FILE_DIR parameter values
In Oracle EBS, the PLSQL IO files are typically stored in the /usr/tmp directory of the Database Node. This is a common practice across all EBS versions, starting from 11i to R12.2. EBS achieves this by utilizing the UTL_FILE_DIR initialization parameter. However, starting from version 18c, the UTL_FILE_DIR initialization parameter has been deprecated and is no longer supported.
To address this change in Oracle 19c, Oracle for EBS has introduced new views in the APPS schema, namely apps.v$parameter and apps.v$parameter2, which provide a supplemental parameter for UTL_FILE_DIR. In order to configure this parameter, please refer to the instructions provided in Section 3.1.1 of the document titled ‘Using UTL_FILE_DIR or Database Directories for PL/SQL File I/O in Oracle E-Business Suite Releases 12.1 and 12.2′ (Doc ID 2525754.1).”
Now, we need to execute the txkCfgUtlfileDir.pl script twice in different modes to complete this task. First, run the script in the ‘getUtlFileDir‘ mode to retrieve the directory paths previously specified in the UTL_FILE_DIR database initialization parameter and prepare them for the upgrade. Subsequently, execute the script in the ‘setUtlFileDir’ mode to store the directory paths in the new Oracle E-Business Suite tables that underlie the apps.v$parameter and apps.v$parameter2 views, and to create the corresponding directory objects.
To retrieve the directory path values from the source UTL_FILE_DIR database initialization parameter, follow these steps:
a) Source the Oracle E-Business Suite database environment of your 11g or 12c Oracle home.
|
[oracle@test1 ~]$ . ./PROD_test1.env [oracle@test1 ~]$ echo $CONTEXT_FILE /u01/oracle/PROD/12.1.0/appsutil/PROD_test1.xml [oracle@test1 ~]$ echo $ORACLE_HOME /u01/oracle/PROD/12.1.0 |
b) Run txkCfgUtlfileDir.pl script in getUtlFileDir mode using the following command:
|
$ perl $ORACLE_HOME/appsutil/bin/txkCfgUtlfileDir.pl -contextfile=<DB Context File> -oraclehome=<11g/12c ORACLE_HOME> -outdir=<Output/Log location> -upgradedhome=<19c ORACLE_HOME> -mode=getUtlFileDir -servicetype=onpremise|opc [oracle@test1 ~]$ perl $ORACLE_HOME/appsutil/bin/txkCfgUtlfileDir.pl -contextfile=/u01/oracle/PROD/12.1.0/appsutil/PROD_test1.xml -oraclehome=/u01/oracle/PROD/12.1.0 -outdir=/tmp -upgradedhome=/u01/oracle/PROD/19.0.0 -mode=getUtlFileDir -servicetype=onpremise Enter the APPS Password: Script Name : txkCfgUtlfileDir.pl Script Version : 120.0.12020000.29 Started : Mon Jul 17 18:47:47 PKT 2023 Log File : /tmp/TXK_UTIL_DIR_Mon_Jul_17_18_47_46_2023/txkCfgUtlfileDir.log
Context file: /u01/oracle/PROD/12.1.0/appsutil/PROD_test1.xml exists.
==============================================================================
Successfully generated the below file with UTL_FILE_DIR content: /u01/oracle/PROD/12.1.0/dbs/PROD_utlfiledir.txt
==============================================================================
Completed : Mon Jul 17 18:47:48 PKT 2023 Successfully Completed the script ERRORCODE = 0 ERRORCODE_END Using this command, the script retrieves the directory paths stored in the UTL_FILE_DIR database initialization parameter. It then modifies these paths to prepare them for usage in Oracle Database 19c. As a result, a text file named <DB_NAME>_utlfiledir.txt is created in the <ORACLE_HOME>/dbs directory. This file contains the list of modified directory paths. Additionally, the script saves the original values from the 11g or 12c UTL_FILE_DIR database initialization parameter, along with the corresponding 19c replacement values, in a text file located in the log directory. To review the modifications made by the script, you can compare this log file with the <DB_NAME>_utlfiledir.txt file present in the <ORACLE_HOME>/dbs directory. |
c) Creating the directory paths of the directories for UTL in the end of the file created /u01/oracle/PROD/12.1.0/dbs/PROD_utlfiledir.txt
|
[oracle@test1 ~]$ cat /u01/oracle/PROD/12.1.0/dbs/PROD_utlfiledir.txt /u01/oracle/PROD/temp/PROD /u01/oracle/PROD/temp/PROD /u01/oracle/PROD/19.0.0/appsutil/outbound/PROD_test1 /u01/oracle/PROD/temp/PROD [oracle@test1 ~]$ mkdir -p /u01/oracle/PROD/temp/PROD [oracle@test1 ~]$ mkdir -p /u01/oracle/PROD/temp/PROD [oracle@test1 ~]$ mkdir -p /u01/oracle/PROD/19.0.0/appsutil/outbound/PROD_test1 [oracle@test1 ~]$ mkdir -p /u01/oracle/PROD/temp/PROD |
Source the Oracle E-Business Suite database environment of your 11g or 12c Oracle home.
|
[oracle@test1 ~]$ . ./PROD_test1.env Run the txkCfgUtlfileDir.pl script in setUtlFileDir mode using the following command: $ perl $ORACLE_HOME/appsutil/bin/txkCfgUtlfileDir.pl -contextfile=<DB Context File> -oraclehome=<11g/12c ORACLE_HOME> -outdir=<Output/Log location> -upgradedhome=<19c ORACLE_HOME> -mode=setUtlFileDir -servicetype=onpremise|opc [ -skipdirvalidation=Yes ] [oracle@test1 ~]$ perl $ORACLE_HOME/appsutil/bin/txkCfgUtlfileDir.pl -contextfile=/u01/oracle/PROD/12.1.0/appsutil/PROD_test1.xml -oraclehome=/u01/oracle/PROD/12.1.0 -outdir=/tmp -upgradedhome=/u01/oracle/PROD/19.0.0 -mode=setUtlFileDir -servicetype=onpremise Enter the APPS Password: Script Name : txkCfgUtlfileDir.pl Script Version : 120.0.12020000.29 Started : Mon Jul 17 19:03:46 PKT 2023 Log File : /tmp/TXK_UTIL_DIR_Mon_Jul_17_19_03_45_2023/txkCfgUtlfileDir.log Context file: /u01/oracle/PROD/12.1.0/appsutil/PROD_test1.xml exists. Enter the ebs_system Password: Completed : Mon Jul 17 19:03:52 PKT 2023 Successfully Completed the script ERRORCODE = 0 ERRORCODE_END |
Step 3. Shut down the application tier server processes
On each application tier server node, shut down all server processes or services. The applications will be unavailable to users until all remaining tasks in this section are completed.
This should be already down based on pervious adop cycle steps.
Step 4. Drop SYS.ENABLED$INDEXES
Source 12c Database environment file
If the SYS.ENABLED$INDEXES table exists, connect to the database as SYSDBA, and run the following command to drop the table:
|
[oracle@test1 ~]$ sqlplus / as sysdba SQL> drop table sys.enabled$indexes; drop table sys.enabled$indexes * ERROR at line 1: ORA-00942: table or view does not exist Proceed Further if table doesn’t exists. |
Step 5. Shut down the database listener
Source 12c Environment file
[oracle@test1 ~]$ . ./PROD_test1.env
On the database tier server node, shut down the Oracle Net or Net8 database listener in the old Oracle home.
[oracle@test1 ~]$ lsnrctl stop $ORACLE_SID
LSNRCTL for Linux: Version 12.1.0.2.0 – Production on 17-JUL-2023 19:09:23
Copyright (c) 1991, 2014, Oracle. All rights reserved.
Connecting to (DESCRIPTION=(ADDRESS=(PROTOCOL=TCP)(HOST=test1.example.com)(PORT=1521)))
The command was completed successfully
Note: To ensure that the database does not inadvertently point to a non-existent listener during the upgrade, verify that you do not have the LOCAL_LISTENER initialization parameter set.
[oracle@test1 ~]$ sqlplus / as sysdba
SQL> show parameter LOCAL_LISTENER
NAME TYPE VALUE
———————————— ———– ——————————
local_listener string PROD_LOCAL
SQL> alter system set local_listener=”;
System altered.
SQL> show parameter LOCAL_LISTENER
NAME TYPE VALUE
———————————— ———– —- ————————–
local_listener string
Step 6. Database Pre Upgrade Steps
Modify the following initialization parameters before the upgrade:
- Comment out all the deprecated initialization parameters. Any necessary parameter will be added back in after the upgrade.
- Unset the olap_page_pool_size initialization parameter.
SQL> alter system set olap_page_pool_size=0 scope=spfile;
- If you have an 11g source database, set the PGA_AGGREGATE_TARGET initialization parameter to at least 10G.
- Set the SGA_TARGET initialization parameter to at least 2G.
- Add the event EVENT=’10946 trace name context forever, level 8454144‘
SQL> alter system set event=’10946 trace name context forever, level 8454144′ scope=spfile;
Shut down and restart the database to enable the parameters.
Step 7. Run the Pre-upgrade Tool
Connect to the 12c Database and run the command as below:
[oracle@test1 ~]$ /u01/oracle/PROD/12.1.0/jdk/bin/java -jar /u01/oracle/PROD/19.0.0/rdbms/admin/preupgrade.jar
==================
PREUPGRADE SUMMARY
==================
/u01/oracle/PROD/12.1.0/cfgtoollogs/PROD/preupgrade/preupgrade.log
/u01/oracle/PROD/12.1.0/cfgtoollogs/PROD/preupgrade/preupgrade_fixups.sql
/u01/oracle/PROD/12.1.0/cfgtoollogs/PROD/preupgrade/postupgrade_fixups.sql
Execute fixup scripts as indicated below:
Before upgrade:
Log into the database and execute the preupgrade fixups
@/u01/oracle/PROD/12.1.0/cfgtoollogs/PROD/preupgrade/preupgrade_fixups.sql
After the upgrade:
Log into the database and execute the postupgrade fixups
@/u01/oracle/PROD/12.1.0/cfgtoollogs/PROD/preupgrade/postupgrade_fixups.sql
As per the recommendation above by the Pre Upgrade tool we will execute preupgrade_fixups.sql
|
SQL> alter system set processes=300 scope=spfile; SQL>set head off SQL>zet lines 200 pages 200 SQL>set echo off SQL>set feedback off; SQL>spool hidden_parameter.sql SQL>SELECT ‘alter system reset ‘||'”‘||name||'”‘||’ scope =spfile;’ FROM SYS.V$PARAMETER WHERE name LIKE ‘_%’ ESCAPE ”; SQL>spool off SQL>@hidden_parameter.sql
SQL> @/u01/oracle/PROD/12.1.0/cfgtoollogs/PROD/preupgrade/preupgrade_fixups.sql Executing Oracle PRE-Upgrade Fixup Script Auto-Generated by: Oracle Preupgrade Script Version: 19.0.0.0.0 Build: 13 Generated on: 2023-07-17 21:56:05 For Source Database: PROD Source Database Version: 12.1.0.2.0 For Upgrade to Version: 19.0.0.0.0 Preup Preupgrade Action Issue Is Number Preupgrade Check Name Remedied Further DBA Action —— ———————— ———- ——————————–
Further action is optional.
Further action is optional.
Further action is optional.
Further action is optional.
Further action is optional.
Further action is optional.
Further action is optional. The fixup scripts have been run and resolved what they can. However, there are still issues originally identified by the preupgrade that have not been remedied and are still present in the database. Depending on the severity of the specific issue, and the nature of the issue itself, that could mean that your database is not ready for upgrade. To resolve the outstanding issues, start by reviewing the preupgrade_fixups.sql and searching it for the name of the failed CHECK NAME or Preupgrade Action Number listed above. There you will find the original corresponding diagnostic message from the preupgrade which explains in more detail what still needs to be done.
PL/SQL procedure successfully completed. |
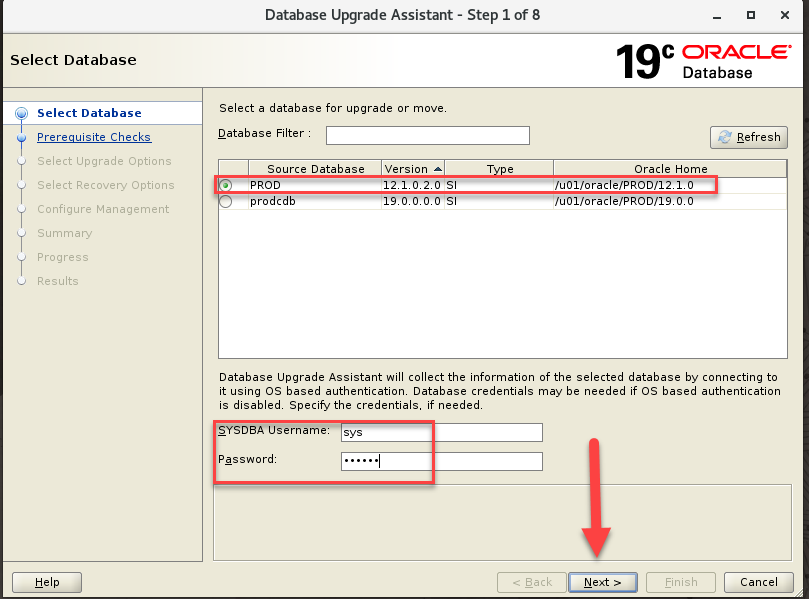
Section 8 – Upgrade the database instance
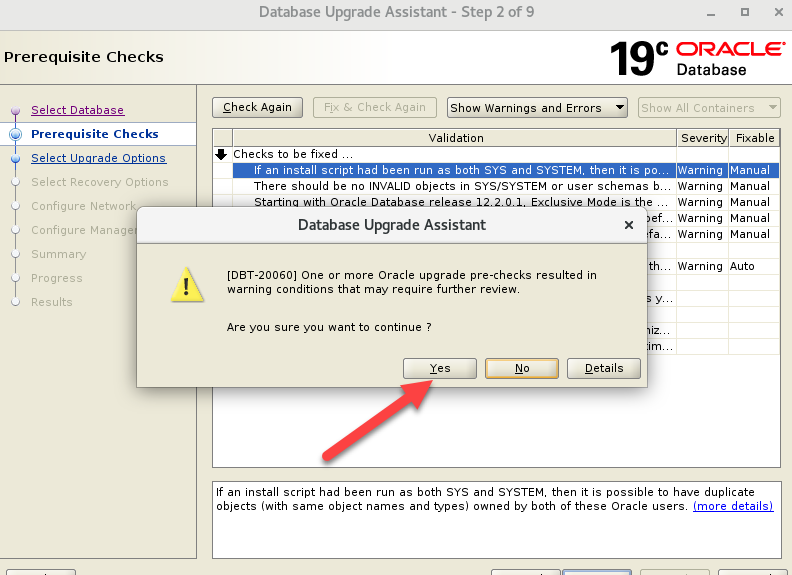
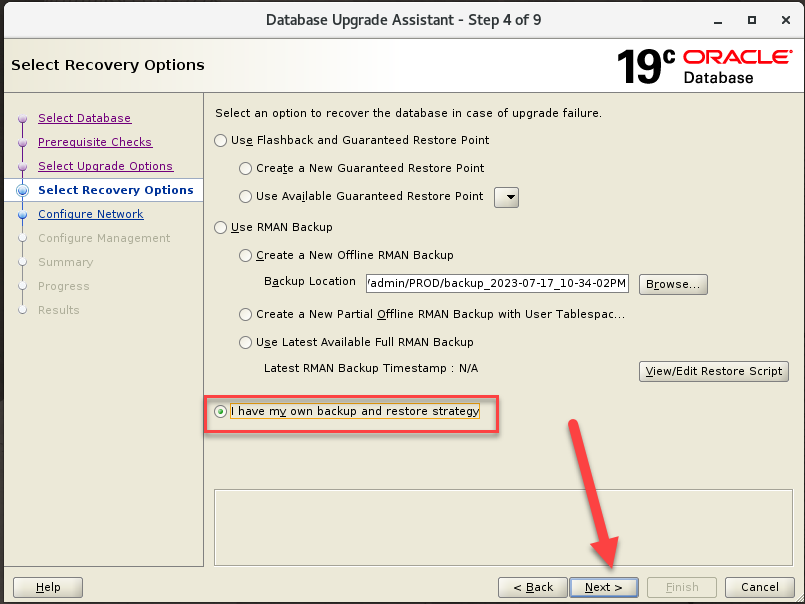
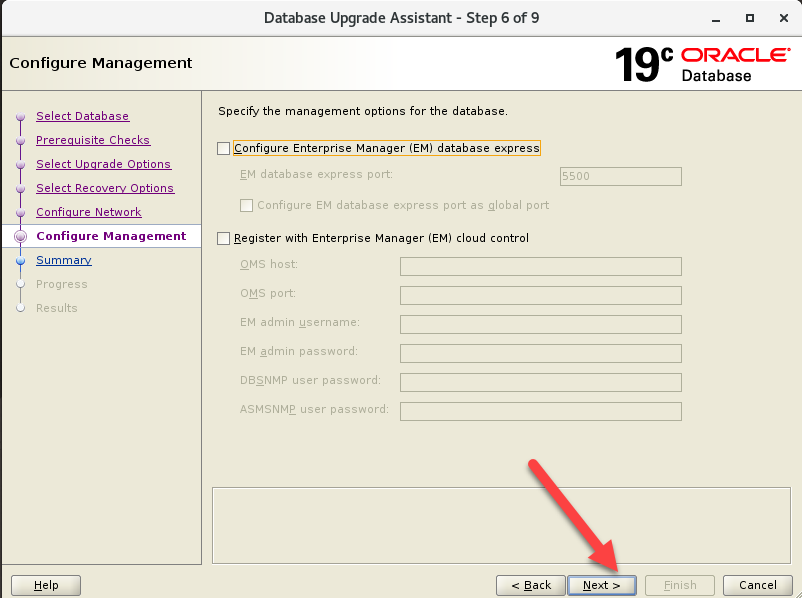
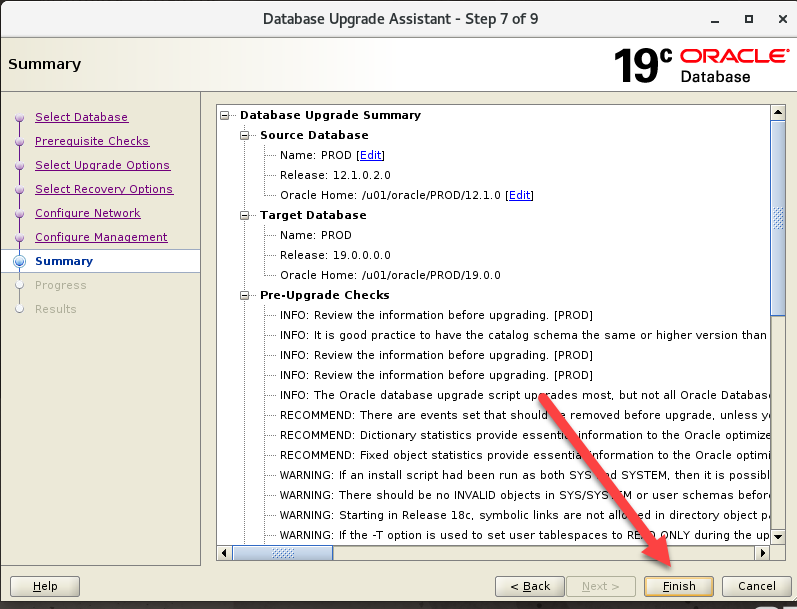
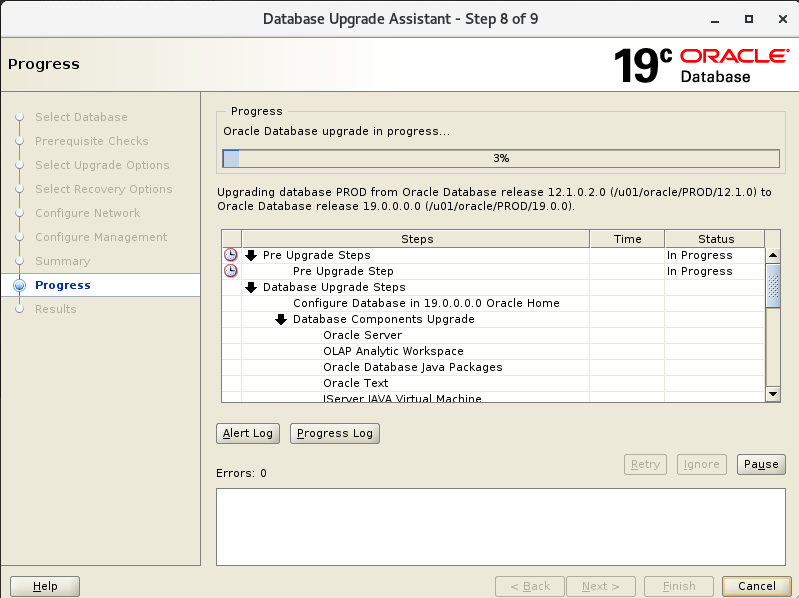
Step 1. Running Database Upgrade using DBUA
Invoke DBUA using the following command. The keep events parameter allows events in the pre-upgraded database to be enabled during the upgrade.
In Oracle Database 19c, the DMSYS schema is no longer used. The Data Mining option is installed in the SYS schema. The Oracle 19c pre-upgrade tool has been extended to include a warning that the DMSYS schema should be dropped. If this warning is reported, it is recommended to drop the schema. Removing the DMSYS schema has no effect on the functioning of Data Mining.
Disregard warnings related to Network ACLs. AutoConfig manages all the Oracle E-Business Suite Network ACLs.
When upgrading all statistics tables, note that Oracle E-Business Suite has only one statistics table (APPLSYS.FND_STATTAB) that needs to be upgraded.
Make sure 12c db entry is present in /etc/oratab. Open GUI and run the below command
Source 19c Environment file
[oracle@test1 ~]$ . ./19c.env
[oracle@test1 ~]$ $ORACLE_HOME/bin/dbua -keepEvents
|
 |
|
 |
|
 |
|
 |
|
 |
|
 |
|
 |
|
 |
|
 |
|
 |
|
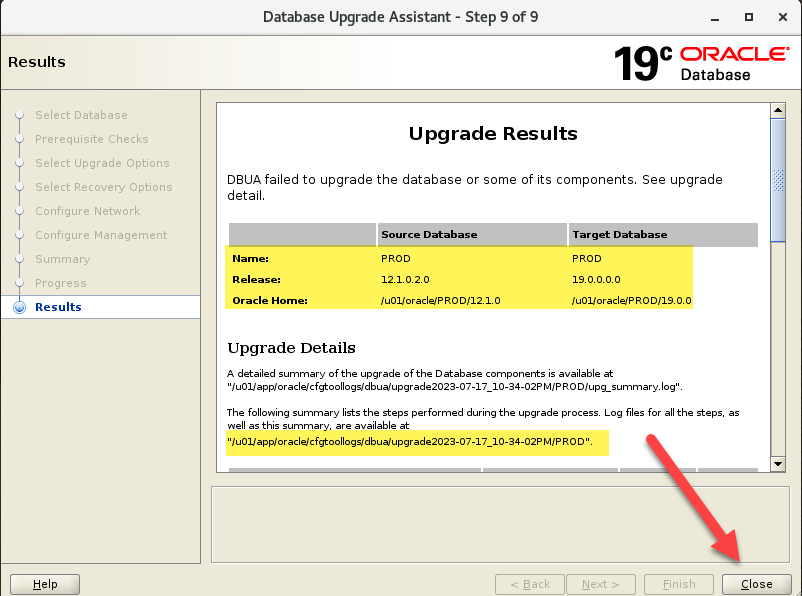 |
The database upgrade has been completed successfully, and the database is ready to use.
SQL> select banner from v$version;
BANNER
——————————————————————————–
Oracle Database 19c Enterprise Edition Release 19.0.0.0.0 – Production
Step 2. Run the Post Upgrade Script generated during the Pre-Upgrade Steps
Source 19c Environment
[oracle@test1 ~]$ . ./19c.env
[oracle@test1 ~]$ export ORACLE_SID=PROD
SQL> @/u01/oracle/PROD/12.1.0/cfgtoollogs/PROD/preupgrade/postupgrade_fixups.sql
Step 3. Post-Upgrade Tasks
Source 19c Environment
[oracle@test1 ~]$ . ./19c.env
[oracle@test1 ~]$ export ORACLE_SID=PROD
There are few important post-upgrade miscellaneous tasks that need to be performed.
If you previously had the SEC_CASE_SENSITIVE_LOGON initialization parameter set to FALSE, re-enable the parameter.
In case spfile is not there then create spfile and restart database.
SQL> alter system set SEC_CASE_SENSITIVE_LOGON=false;
System altered.
SQL> alter trigger SYSTEM.EBS_LOGON compile;
Trigger altered.
SQL> alter system set compatible=’19.0.0′ scope=spfile;
System altered.
Restart DB
SQL> shu immediate;
Database closed.
Databas edismounted.
ORACLE instance shut down.
SQL> startup
ORA-32004: obsolete or deprecated parameter(s) specified for RDBMS instance
ORACLE instance started.
Total System Global Area 4294963248 bytes
Fixed Size 8933424 bytes
Variable Size 2583691264 bytes
Database Buffers 1677721600 bytes
Redo Buffers 24616960 bytes
Database mounted.
Database opened.
SQL> show parameter compatible
NAME TYPE VALUE
———————————— ———– ——————————
compatible string 19.0.0
noncdb_compatible boolean FALSE
Step 4. Run DataPatch
Source 19c Environment
[oracle@test1 ~]$ . ./19c.env
[oracle@test1 ~]$ export ORACLE_SID=PROD
[oracle@test1 OPatch]$ $ORACLE_HOME/OPatch/datapatch
Step 5. Connect to sysdba and run below
Source 19c Environment
[oracle@test1 ~]$ . ./19c.env
[oracle@test1 ~]$ export ORACLE_SID=PROD
SQL> @?/rdbms/admin/dbmsxdbschmig.sql
SQL> @?/rdbms/admin/prvtxdbschmig.plb
Step 6. Run ADgrants
Source 19c Environment
[oracle@test1 ~]$ . ./19c.env
[oracle@test1 ~]$ export ORACLE_SID=PROD
Copy adgrants.sql from $APPL_TOP/admin to DB tier and run it
[oracle@test1 ~]$ cp /u01/oracle/PROD/fs1/EBSapps/appl/admin/adgrants.sql /u01/oracle/PROD/19.0.0/appsutil
SQL> @/u01/oracle/PROD/19.0.0/appsutil/adgrants.sql apps
Step 7. Grant create procedure privilege on CTXSYS
Source 19c Environment
[oracle@test1 ~]$ . ./19c.env
[oracle@test1 ~]$ export ORACLE_SID=PROD
Copy $AD_TOP/patch/115/sql/adctxprv.sql from the administration server node to the database server node.
Use SQL*Plus to connect to the database as apps and run the script using the following command:
[oracle@test1 admin]$ cp $AD_TOP/patch/115/sql/adctxprv.sql /u01/oracle/PROD/19.0.0/
$ sqlplus apps/<apps password> @adctxprv.sql <SYSTEM password> CTXSYS
[oracle@test1 ~]$ cd /u01/oracle/PROD/19.0.0/
[oracle@test1 19.0.0]$ sqlplus apps/apps @adctxprv.sql oracle CTXSYS
SQL*Plus: Release 19.0.0.0.0 – Production on Tue Jul 18 01:16:40 2023
Version 19.19.0.0.0
Copyright (c) 1982, 2022, Oracle. All rights reserved.
Last Successful login time: Mon Jul 17 2023 19:03:52 +05:00
Connected to:
Oracle Database 19c Enterprise Edition Release 19.0.0.0.0 – Production
Version 19.19.0.0.0
Commit complete.
Disconnected from Oracle Database 19c Enterprise Edition Release 19.0.0.0.0 – Production
Version 19.19.0.0.0
Step 8. Compile invalid objects
Source 19c Environment
[oracle@test1 ~]$ . ./19c.env
[oracle@test1 ~]$ export ORACLE_SID=PROD
Use SQL*Plus to connect to the database as SYSDBA and run the $ORACLE_HOME/rdbms/admin/utlrp.sql script to compile invalid objects.
$ sqlplus “/ as sysdba” @$ORACLE_HOME/rdbms/admin/utlrp.sql
Run the following Query to check the INVALID Objects
SQL> select count(*) from dba_objects where status=’INVALID’;
Step 9. Grant datastore access
Source 19c Environment
[oracle@test1 ~]$ . ./19c.env
[oracle@test1 ~]$ export ORACLE_SID=PROD
Use SQL*Plus to connect to the database as SYSDBA and run the following command:
[oracle@test1 ~]$ sqlplus “/ as sysdba”
SQL> grant text datastore access to public;
Grant succeeded.
Step 10. Gather statistics for the SYS schema
Source 19c Environment
[oracle@test1 ~]$ . ./19c.env
[oracle@test1 ~]$ export ORACLE_SID=PROD
Copy $APPL_TOP/admin/adstats.sql from the administration server node to the database server node. Note that adstats.sql has to be run in restricted mode.
Use SQL*Plus to connect to the database as SYSDBA and use the following commands to run adstats.sql in restricted mode:
[oracle@test1 19.0.0]$ cp /u01/oracle/PROD/fs1/EBSapps/appl/admin/adstats.sql /u01/oracle/PROD/19.0.0/
[oracle@test1 ~]$ sqlplus / as sysdba
SQL> alter system enable restricted session;
System altered.
SQL> @adstats.sql
Connected.
————————————————–
— adstats.sql started at 2023-07-18 11:48:37 —
Checking for the DB version and collecting statistics …
PL/SQL procedure successfully completed.
————————————————
— adstats.sql ended at 2023-07-18 11:55:38 —
Commit complete.
Disconnected from Oracle Database 19c Enterprise Edition Release 19.0.0.0.0 – Production
Version 19.19.0.0.0
[oracle@test1 19.0.0]$ sqlplus / as sysdba
SQL> alter system disable restricted session;
System altered.
SQL> exit
Step 11. Convert Database to Multitenant Architecture or PDB
Source 19c Environment
[oracle@test1 ~]$ . ./19c.env
[oracle@test1 ~]$ export ORACLE_SID=PROD
|
a) Create the PDB descriptor
- $ cd $ORACLE_HOME/appsutil
- $ . ./txkSetCfgCDB.env dboraclehome=<full path of 19c ORACLE_HOME>
- $ export ORACLE_SID=<source SID>
- $ cd $ORACLE_HOME/appsutil/bin
- $ perl txkOnPremPrePDBCreationTasks.pl -dboraclehome=<ORACLE_HOME> -outdir=<ORACLE_HOME>/appsutil/log -appsuser=<apps user> -dbsid=<source SID>
[oracle@test1 ~]$ cd $ORACLE_HOME/appsutil[oracle@test1 appsutil]$ . ./txkSetCfgCDB.env dboraclehome=/u01/oracle/PROD/19.0.0 Oracle Home being passed: /u01/oracle/PROD/19.0.0
oracle@test1 appsutil]$ export ORACLE_SID=PROD
oracle@test1 appsutil]$ cd $ORACLE_HOME/appsutil/bin
oracle@test1 bin]$ perl txkOnPremPrePDBCreationTasks.pl -dboraclehome=/u01/oracle/PROD/19.0.0 -outdir=/u01/oracle/PROD/19.0.0/appsutil/log -appsuser=apps -dbsid=PROD
Enter the APPS Password:
****************************************************************************************
* *
* IMPORTANT NOTE: DO NOT START THE DB TILL THE DATA FILES ARE MIGRATED *
* *
* IF DB IS STARTED, THEN PDB DESCRIPTOR XML GENERATED BECOMES INVALID *
* *
****************************************************************************************
Exiting from the script.
Ended: Tue Jul 18 12:01:42 PKT 2023
b) Update the CDB initialization parameters
On the database server node, copy the <source SID>_initparam.sql and <source SID>_datatop.txt files from the source $ORACLE_HOME/dbs directory to the new$ORACLE_HOME/dbs directory. Then use SQL*Plus to connect to the CDB as SYSDBA, and run the following commands to update the CDB initialization parameters
- $ cd $ORACLE_HOME/appsutil
- $ . ./txkSetCfgCDB.env dboraclehome=<full path of ORACLE_HOME>
- $ export ORACLE_SID=<CDB SID>
- $ sqlplus “/ as sysdba”
- SQL> startup nomount;
- SQL> @$ORACLE_HOME/dbs/<source SID>_initparam.sql
- SQL> alter system set LOCAL_LISTENER=”<hostname>:<cdb port number>” scope=both;
- SQL> shutdown;
- SQL> startup;
[oracle@test1 bin]$ cd /u01/oracle/PROD/12.1.0/dbs
[oracle@test1 dbs]$ cp PROD_initparam.sql PROD_datatop.txt /u01/oracle/PROD/19.0.0/dbs/
[oracle@test1 dbs]$ cd $ORACLE_HOME/appsutil
[oracle@test1 appsutil]$ . ./txkSetCfgCDB.env dboraclehome=$ORACLE_HOME
Oracle Home being passed: /u01/oracle/PROD/19.0.0
[oracle@test1 appsutil]$ export ORACLE_SID=prodcdb
[oracle@test1 appsutil]$ sqlplus “/ as sysdba”
SQL*Plus: Release 19.0.0.0.0 – Production on Tue Jul 18 12:07:23 2023
Version 19.19.0.0.0
Copyright (c) 1982, 2022, Oracle. All rights reserved.
Connected to an idle instance.
SQL> startup nomount;
ORACLE instance started.
Total System Global Area 2147482336 bytes
Fixed Size 9136864 bytes
Variable Size 570425344 bytes
Database Buffers 1560281088 bytes
Redo Buffers 7639040 bytes
SQL> @$ORACLE_HOME/dbs/PROD_initparam.sql
SQL> alter system set LOCAL_LISTENER=”test1.example.com:1522″ scope=both;
System altered.
SQL> shutdown
ORA-01507: database not mounted
ORACLE instance shut down.
SQL> startup
ORA-32004: obsolete or deprecated parameter(s) specified for RDBMS instance
ORACLE instance started.
Total System Global Area 4294963736 bytes
Fixed Size 9171480 bytes
Variable Size 2583691264 bytes
Database Buffers 1677721600 bytes
Redo Buffers 24379392 bytes
Database mounted.
Database opened.
SQL> select name,open_mode from v$database;
NAME OPEN_MODE
——— ——————–
PRODCDB READ WRITE
c) Check for PDB violations
Use the following commands to run the txkChkPDBCompatability.pl script. This checks the PDB for any violations.
- $ cd $ORACLE_HOME/appsutil
- $ . ./txkSetCfgCDB.env dboraclehome=<full path of ORACLE_HOME>
- $ export ORACLE_SID=<CDB SID>
- $ cd $ORACLE_HOME/appsutil/bin
- $ perl txkChkPDBCompatability.pl -dboraclehome=<ORACLE_HOME>
- -outdir=<ORACLE_HOME>/appsutil/log -cdbsid=<CDB SID>
- -pdbsid=<source SID> -servicetype=onpremise
[oracle@test1 appsutil]$ cd $ORACLE_HOME/appsutil
[oracle@test1 appsutil]$ . ./txkSetCfgCDB.env dboraclehome=$ORACLE_HOME
Oracle Home being passed: /u01/oracle/PROD/19.0.0
[oracle@test1 appsutil]$ export ORACLE_SID=prodcdb
[oracle@test1 appsutil]$ cd $ORACLE_HOME/appsutil/bin
[oracle@test1 bin]$ perl txkChkPDBCompatability.pl -dboraclehome=$ORACLE_HOME -outdir=$ORACLE_HOME/appsutil/log -cdbsid=prodcdb -pdbsid=PROD -servicetype=onpremise
****************************************************************************************
* *
* IMPORTANT NOTE: RESOLVE ALL VIOLATIONS BEFORE PROCEEDING TO CREATE PDB *
* *
* – All the errors except SQL PATCH ERRORS should be resolved *
* *
* – All the warnings except CHARACTER SET WARNINGS can be ignored *
* *
* – Review and set the INIT PARAMETERs to match the EBS requirements *
* *
****************************************************************************************
Note: Use the same command options for Oracle Cloud Infrastructure Compute environments.
Review all warnings and resolve all errors. Re-run the script to verify all errors have been resolved. Do not run noncdb_to_pdb.sql as that will be run by txkCreatePDB.pl in the next step.
d) Create the PDB
Load the environment variables by running the following commands.
Make sure to extend tablespaces on CDB to have sufficient space.
$ cd $ORACLE_HOME/appsutil
$ . ./txkSetCfgCDB.env dboraclehome=<full path of ORACLE_HOME>
$ cd $ORACLE_HOME/appsutil/bin
$ perl txkCreatePDB.pl -dboraclehome=<ORACLE_HOME> -outdir=<ORACLE_HOME>/appsutil/log
-cdbsid=<CDB SID> -pdbsid=<source SID> -dbuniquename=<CDB SID> -servicetype=onpremise
Note: Use the same command options for Oracle Cloud Infrastructure Compute environments.
The PDB datafile location can be the same as the source datafile location.
[oracle@test1 bin]$ cd $ORACLE_HOME/appsutil
[oracle@test1 appsutil]$ . ./txkSetCfgCDB.env dboraclehome=$ORACLE_HOME
Oracle Home being passed: /u01/oracle/PROD/19.0.0
[oracle@test1 appsutil]$ cd $ORACLE_HOME/appsutil/bin
[oracle@test1 bin]$ perl txkCreatePDB.pl -dboraclehome=$ORACLE_HOME -outdir=$ORACLE_HOME/appsutil/log -cdbsid=prodcdb -pdbsid=PROD -dbuniquename=prodcdb -servicetype=onpremise
============================
Inside promptDataTopDir()…
============================
Number of DATA_TOPs: 1
DATA_TOP_1
===========
Enter the non-CDB data top [/u01/oracle/PROD/data]:
Enter the corresponding PDB data top [/u01/oracle/PROD/data]:
The PDB datafile location can be the same as the source datafile location.
e) Run the post-PDB script
Source 19c Environment
[oracle@test1 ~]$ . ./19c.env
[oracle@test1 ~]$ export ORACLE_SID=PROD
change CDB system password
[oracle@test1 ~]$ sqlplus / as sysdba
SQL> alter user system identified by oracle#123;
User altered.
Use the following commands to run the txkPostPDBCreationTasks.pl script. This updates the PDB configuration.
$ cd $ORACLE_HOME/appsutil
$ . ./txkSetCfgCDB.env dboraclehome=<full path of ORACLE_HOME>
$ perl $ORACLE_HOME/appsutil/bin/txkPostPDBCreationTasks.pl -dboraclehome=<ORACLE_HOME>
-outdir=<ORACLE_HOME>/appsutil/log -cdbsid=<CDB SID> -pdbsid=<PDB SID>
-appsuser=apps -dbport=<CDB TNS port number> -servicetype=onpremise
[oracle@test1 bin]$ cd $ORACLE_HOME/appsutil
[oracle@test1 appsutil]$ . ./txkSetCfgCDB.env dboraclehome=$ORACLE_HOME
Oracle Home being passed: /u01/oracle/PROD/19.0.0
[oracle@test1 appsutil]$ cd $ORACLE_HOME/appsutil/bin
[oracle@test1 appsutil perl $ORACLE_HOME/appsutil/bin/txkPostPDBCreationTasks.pl -dboraclehome=$ORACLE_HOME -outdir=$ORACLE_HOME/appsutil/log -cdbsid=prodcdb -pdbsid=PROD -appsuser=apps -dbport=1522 -servicetype=onpremise
Enter the APPS Password:
Enter the CDB SYSTEM Password:
#####################################################################
# I M P O R T A N T N O T E #
# #
# EBS_SYSTEM credentials are set to same value as that of SYSTEM #
Note: Use the same command options for Oracle Cloud Infrastructure Compute environments.
This step also runs the autoconfig at DB level.
SQL> show pdbs
CON_ID CON_NAME OPEN MODE RESTRICTED
———- —————————— ———- ———-
2 PDB$SEED READ ONLY NO
3 PROD READ WRITE NO
f) Change Initialization Parameters
Use the following sections in My Oracle Support Knowledge Document 396009.1, Database Initialization Parameter Settings for Oracle E-Business Suite Release 12, as a guideline in modifying your initialization parameters.
[oracle@test1 appsutil]$ export ORACLE_SID=prodcdb
[oracle@test1 appsutil]$ sqlplus / as sysdba
SQL> alter system set event=’10946 trace name context forever, level 8454144′ scope=spfile;
System altered.
SQL> alter system set sec_case_sensitive_logon=FALSE scope=spfile;
System altered.
Step 12. Run Autoconfig on the Application tier
Add the CDB entry in tnsnames.ora of Application
<TWO_TASK> =
(DESCRIPTION =
(ADDRESS = (PROTOCOL=tcp)(HOST=<hostname>.<domain>)(PORT=<port number>))
(CONNECT_DATA = (SERVICE_NAME=ebs_<PDB SID>)(INSTANCE_NAME=<CDB SID>))
)
As the user of the applications server node, on both the Patch and Run APPL_TOP, modify the $TNS_ADMIN/tnsnames.ora file to specify the CDB instance name. The following shows the format of the new TNS entry.
[oracle@test1 ~]$ . ./EBSapps.env run
E-Business Suite Environment Information
—————————————-
RUN File System : /u01/oracle/PROD/fs1/EBSapps/appl
PATCH File System : /u01/oracle/PROD/fs2/EBSapps/appl
Non-Editioned File System : /u01/oracle/PROD/fs_ne
DB Host: test1.example.com Service/SID: PROD
Sourcing the RUN File System …
[oracle@test1 ~]$ cd $TNS_ADMIN
[oracle@test1 admin]$ pwd
/u01/oracle/PROD/fs1/inst/apps/PROD_test1/ora/10.1.2/network/admin
[oracle@test1 admin]$ vi tnsnames.ora
prodcdb =
(DESCRIPTION =
(ADDRESS = (PROTOCOL=tcp)(HOST= test1.example.com)(PORT=1522))
(CONNECT_DATA = (SERVICE_NAME=ebs_PROD)(INSTANCE_NAME=prodcdb))
)
- Edit the same in Patch File System
[oracle@test1 ~]$ . ./EBSapps.env patch
E-Business Suite Environment Information
—————————————-
RUN File System : /u01/oracle/PROD/fs1/EBSapps/appl
PATCH File System : /u01/oracle/PROD/fs2/EBSapps/appl
Non-Editioned File System : /u01/oracle/PROD/fs_ne
DB Host: test1.example.com Service/SID: PROD
Sourcing the PATCH File System …
[oracle@test1 ~]$ cd $TNS_ADMIN
[oracle@test1 admin]$ vi tnsnames.ora
Update the following values in the context file of every Applications tier server node.
Variable Name Value
s_dbport New database port
s_apps_jdbc_connect_descriptor NULL
s_applptmp Directory (not /usr/tmp) defined in UTL_FILE_DIR
[oracle@test1 admin]$ grep s_dbport $CONTEXT_FILE
<dbport oa_var=”s_dbport” oa_type=”EXT_PORT” base=”1521″ step=”1″ range=”-1″ label=”Database Port”>1521</dbport>
[oracle@test1 admin]$ grep s_apps_jdbc_connect_descriptor $CONTEXT_FILE
<jdbc_url oa_var=”s_apps_jdbc_connect_descriptor”>jdbc:oracle:thin:@(DESCRIPTION=(ADDRESS_LIST=(LOAD_BALANCE=YES)(FAILOVER=YES)(ADDRESS=(PROTOCOL=tcp)(HOST=test1.example.com)(PORT=1521)))(CONNECT_DATA=(SERVICE_NAME=PROD)))</jdbc_url>
[oracle@test1 admin]$ grep s_applptmp $CONTEXT_FILE
<APPLPTMP oa_var=”s_applptmp” osd=”UNIX”>/usr/tmp</APPLPTMP>
To identify the allowable directories for s_applptmp use, connect to the Oracle E-Business Suite database instance as the app’s user (on PDB)and run the following query:
[oracle@test1 appsutil]$ sqlplus apps/apps@PROD
SQL> select value from v$parameter where name=’utl_file_dir’;
VALUE
——————————————————————————–
/u01/oracle/PROD/temp/PROD,/u01/oracle/PROD/temp/PROD,/u01/oracle/PROD/19.0.0/ap
psutil/outbound/PROD_test1,/u01/oracle/PROD/temp/PROD
/u01/oracle/PROD/temp/PROD
/u01/oracle/PROD/temp/PROD
/u01/oracle/PROD/19.0.0/appsutil/outbound/PROD_test1
[oracle@test1 admin]$ vi $CONTEXT_FILE
Enter the values of s_applptmp and save
[oracle@test1 admin]$ grep s_applptmp $CONTEXT_FILE
<APPLPTMP oa_var=”s_applptmp” osd=”UNIX”>/u01/oracle/PROD/19.0.0/appsutil/outbound/PROD_test1</APPLPTMP>
Edit the same in Patch file System
[oracle@test1 admin]$ vi $CONTEXT_FILE
Enter the values of s_applptmp and save
[oracle@test1 admin]$ grep s_applptmp $CONTEXT_FILE
<APPLPTMP oa_var=”s_applptmp” osd=”UNIX”>/u01/oracle/PROD/19.0.0/appsutil/outbound/PROD_test1</APPLPTMP>
Now, Run AutoConfig on both ‘PATCH’ and ‘RUN’ APPL_TOPs using the following command.
- Running On Run File System
[oracle@test1 admin]$ $INST_TOP/admin/scripts/adautocfg.sh
- Running On Patch File System
[oracle@test1 admin]$ $INST_TOP/admin/scripts/adautocfg.sh
Note: When running AutoConfig on the patch file system APPL_TOP, ignore all errors.
Step 13. Start Application Services and Validate the Database Version
[oracle@test1 ~]$. ./EBSapps.env run
E-Business Suite Environment Information
—————————————-
RUN File System : /u01/oracle/PROD/fs1/EBSapps/appl
PATCH File System : /u01/oracle/PROD/fs2/EBSapps/appl
Non-Editioned File System : /u01/oracle/PROD/fs_ne
DB Host: test1.example.com Service/SID: PROD
Sourcing the RUN File System …
[oracle@test1 ~]$ cd $ADMIN_SCRIPTS_HOME
[oracle@test1 scripts]$ ./adstrtal.sh apps/apps


Thank you all for accompanying us on this journey of upgrading the EBS Apps Database from version12.1.0.2 to 19.19. I sincerely appreciate your time and interest. Please stay tuned for more informative content and updates. We look forward to welcoming you back soon.
If you have not yet explored the blog on Oracle Apps R12.2.12 Installation Steps, we kindly encourage you to follow the provided link.
Oracle Apps R12.2.12 on Oracle Linux OEL 7.9 using Oracle VirtualBox