Syed Saad Ali

Oracle ACE Pro

Oracle Solution Architect

Oracle E-Business Suite

Oracle Cloud Infrastructure

Oracle Fusion Middleware

Oracle Database Administration

Oracle Weblogic Administration

Syed Saad Ali

Oracle ACE Pro

Oracle Solution Architect

Oracle E-Business Suite

Oracle Cloud Infrastructure

Oracle Fusion Middleware

Oracle Database Administration

Oracle Weblogic Administration

Home

About Me

Technically-sophisticated professional with extensive experience in updating server security, executing routine back-ups, and designing and implementing tests of the system to address issues with accessing data

  • Adept at leading the planning, designing, developing, testing, and deploying efficient solutions within Oracle EBS system, in order to satisfy strategic, financial, and operations needs of the organization.
  • Skilled in planning and managing successful projects, mitigating risks, controlling costs, and directing project teams. Instrumental in monitoring routine maintenance of system, implementing the ERP systems, and approving budget.
  • Proven success in analyzing business processes/process re-engineering and recommending solutions. Deft at establishing IT service continuity management strategies, disaster recovery plans and associated test procedures of each critical functional area of the organization.
  • Age: 36
  • Residence: Pakistan
  • Freelance: Available
  • Address: Karachi, PAKISTAN
My Services
Oracle E-Business Suite Upgrade
Oracle E-Business Suite Migration
Oracle Database Upgrade or Migrate
Oracle Maximum Availability Architecture
Performance Evaluation
Pricing
Hire Me On Upwork
$ 35 Hour
  • Database Administration
  • Oracle E-Business Suite Administration
  • Configuration, Administration, Cloning, Patching, Migrating, Support, Maintenance, Monitoring, tuning and capacity planning, User Management, Backup/Recovery Management
Hire Me on Fiverr
$ 35 Hour
  • Database Administration
  • Oracle E-Business Suite Administration
  • Configuration, Administration, Cloning, Patching, Migrating, Support, Maintenance, Monitoring, tuning and capacity planning, User Management, Backup/Recovery Management
Hire Team
$ 40 Hour
  • Database Administration
  • Oracle E-Business Suite Administration
  • Configuration, Administration, Cloning, Patching, Migrating, Support, Maintenance, Monitoring, tuning and capacity planning, User Management, Backup/Recovery Management

Resume

Resume
Experience
Senior Apps DBA
2022- Present
Senior Apps DBA
Computer & Systems Engineering Company
My role includes infrastructure support, capacity planning, installation, configuration, database design, and migration, up gradation, performance monitoring, security,  database backups, data recovery plan, and procedures including application server administration
Lead Infrastructure Consultant
2020-2021
Lead Infrastructure Consultant
ITANZ Group
Managed Oracle cloud infrastructure, compute, storage, networking, connectivity, and edge service, database management, analytics, integration, and Oracle weblogic clustering environment over Oracle Cloud IAAS.  Collaborated with the Oracle corporation staff for offering technical support to diagnose and troubleshoot common problems.
Professional Freelancer
2020 - 2022
Professional Freelancer
Upwork Inc.
Collaborated with Clients for the Task Related to Oracle Database, Oracle E-Business Suite, Oracle Cloud Infrastructure, Oracle Weblogic
Assistant Director (Databases)
2015-2020
Assistant Director (Databases)
Pakistan Civil Aviation Authority
Managed ERP for implementing the structures effectively, while limiting the resources consumed in the planning process. Improved IT/business processes and investigations to resolve the user’s issues as well as offered user’s training to help the user in operating the system in efficient way.
Education
Newports Institute Of Communication & Economics
2008 - 2011
Newports Institute Of Communication & Economics
Pakistan

Newports Institute Of Communication & Economics offers a B.S. in Computer Science.

Certificate
Oracle University
2013
Oracle University
USA

Oracle E-Business Suite R12 Financials Certified Expert  Consultant, PAYABLES 

Certificate
Oracle University
2014
Oracle University
USA

Oracle E-Business Suite R12 Applications Database Administrator Certified Professional 

Certificate
Oracle University
2011
Oracle University
USA

Oracle Database 11g Administrator Certified Professional 

Certificate
Skills
Oracle Expertise
  • Oracle Databases
  • Oracle E-Business Suite
  • Oracle Weblogic
  • Oracle Cloud Infrastructure
  • Oracle Database Appliances
Languages
  • English
System
  • Linux
    90%
  • Microsoft
    75%
  • SOLARIS
    65%
  • AIX
    60%
Knowledge
  • Installation/Configuration
  • Capacity Planning
  • Data Recovery Plan
  • Oracle Database Migration and Upgrade
  • Oracle ERP Migration and Upgrade
  • Linux and Windows management
  • Performance Evaluation

Blog

July 13, 2023 Oracle Linux 7.9 Installation On Virtual Box
APPS DBA

Oracle Linux 7.9 Installation On Virtual Box

In the previous section of this blog series, we explored the installation process of Oracle Virtual Box on a Windows operating system.

Now, we will shift our focus towards preparing a virtual machine for the installation of Oracle Linux.

To accomplish this, we will follow a set of steps to adequately configure the virtual machine. These steps can be utilized to create any virtual machine, with the exception of allocating the appropriate amount of RAM and hard disk space based on specific requirements.

In this case, as we are installing Oracle Apps R12.2.12, we have adjusted the resources such as RAM and hard disk space accordingly to ensure optimal performance during the installation process.


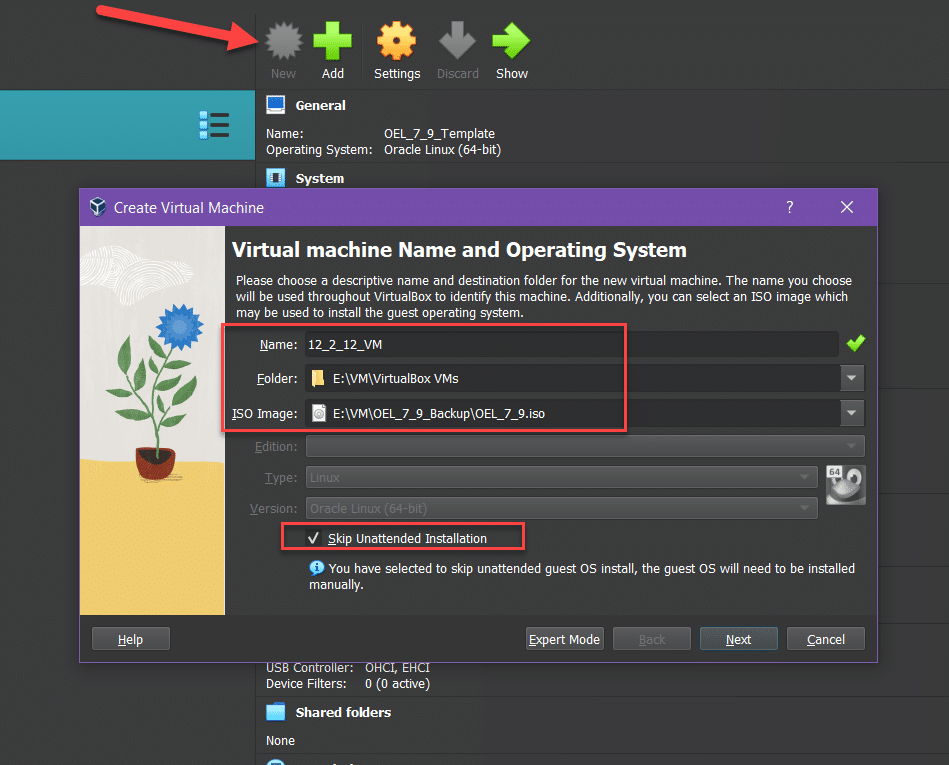
Open Virtual Box And Click New ICON. It will open a Pop Up Box on which Enter the Details of the Following

  • Name: {Name of the Desired VM}
  • Folder: {Folder location where you need to Create the VM]
  • ISO Image: {ISO File of OEL 7.9}
  • Also, Click the Check Box of “Skip Unattended Installation”

Now Click NEXT

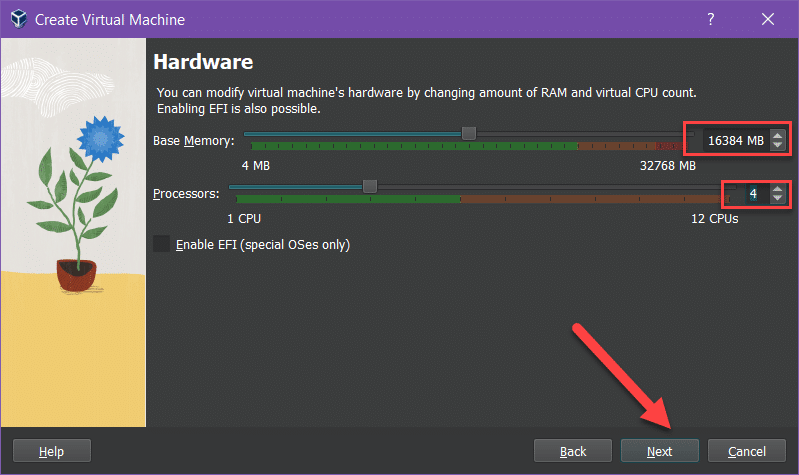
Now Enter the Following Details:

  • Base Memory: {16GB} (As I have Mentioned Before I will configure it on 16gb which is Recommended)
  • Processors: {4}

Now Click Next

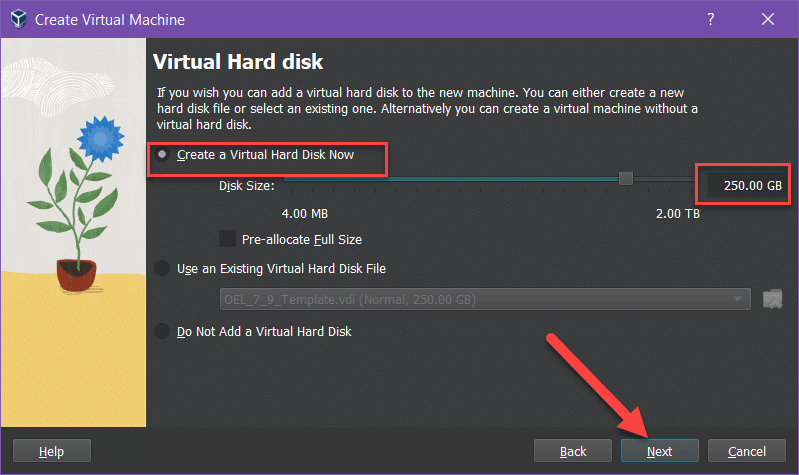
Now in this Step, we will Create a Virtual Hard Disk. As mentioned Before I will be allocating 250 GB size to this disk for Operating System and Staging Area.

Note: If you have a Limitation of Space you can allocate 110 GB for this Hard Disk.

After this Click Next and Then Click Finish to Create a Virtual Machine for Further Configuration


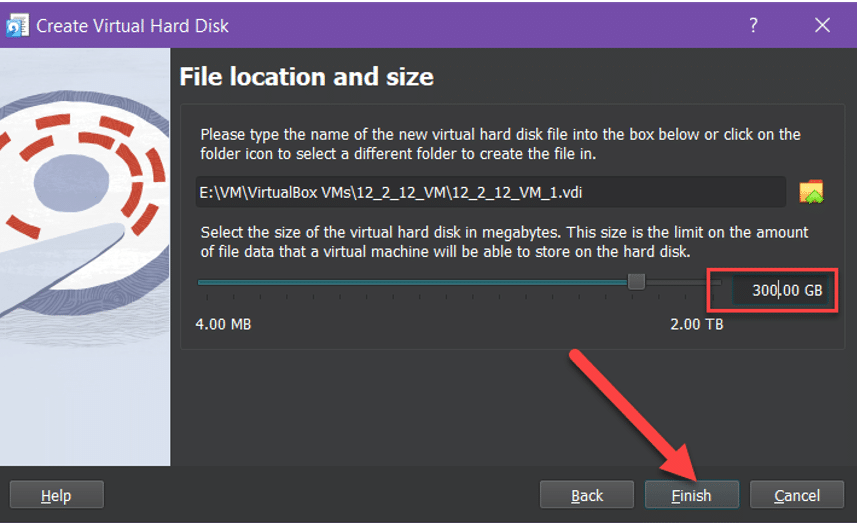
As I have to Install Oracle Apps R12.2.12  in this Linux Virtual Machine, I will add an additional 300 GB Hard Disk for the Application File System and Database.

So for adding one more Hard Disk, we will go in the Settings of the created Virtual Machine by Clicking Settings of this Virtual  Machine.

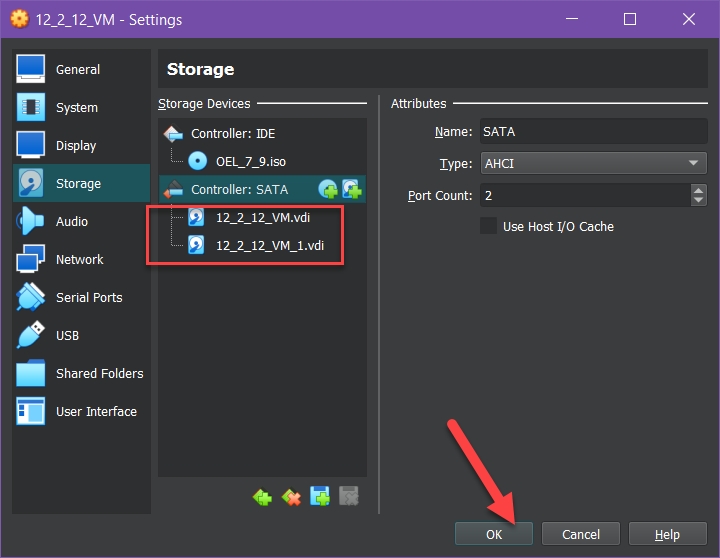
Once The Settings Box opens, go to the Storage TAB and Click on

+ Hard Disk Button as shown in the Picture.

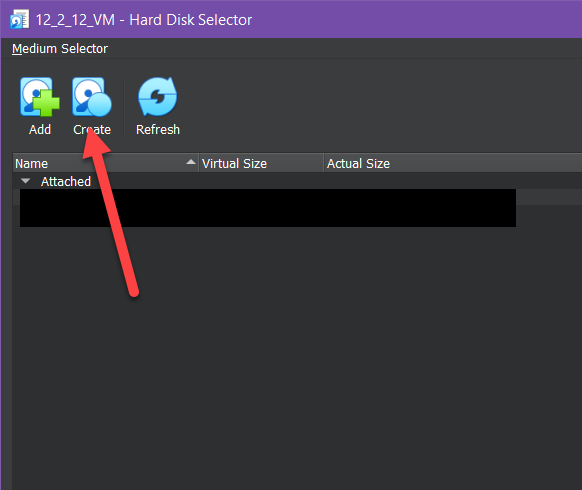
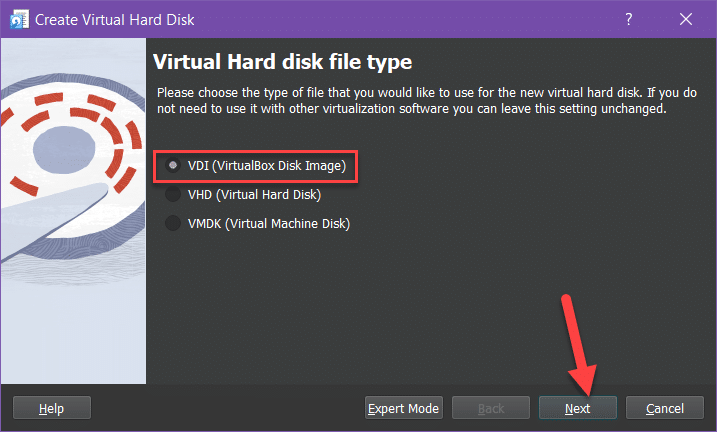
Now Click Create Button to Open a Virtual Hard Disk Creation Wizard

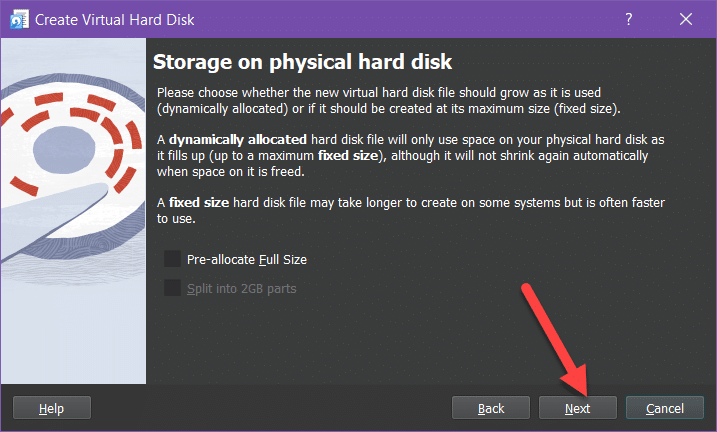
Click Next

Click Next

After Entering the Desired Value of the Hard Disk to Be Created, then Click Finish

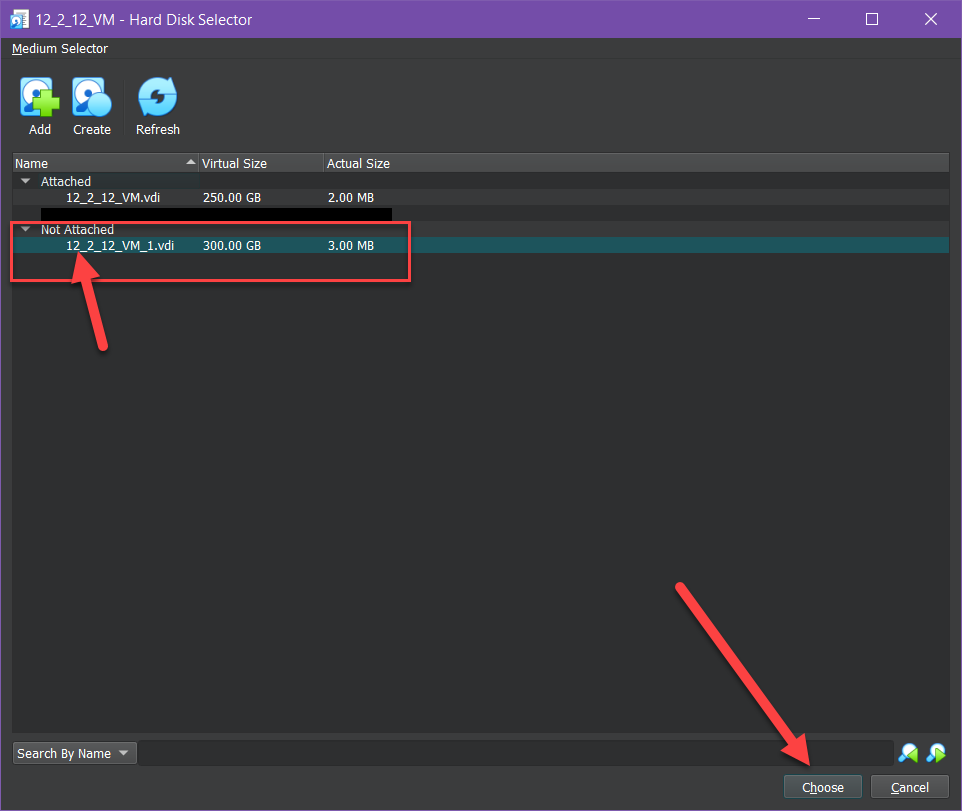
Now as You Can See the Drive that we created in Above Steps is in “Not Attached” Condition. Click This “Hard Disk”  and Click “Choose” as Shown In the Picture Below

As you can see we are Having 2 Hard Disks in this Virtual Machine that we Created. Click OK to Continue Further

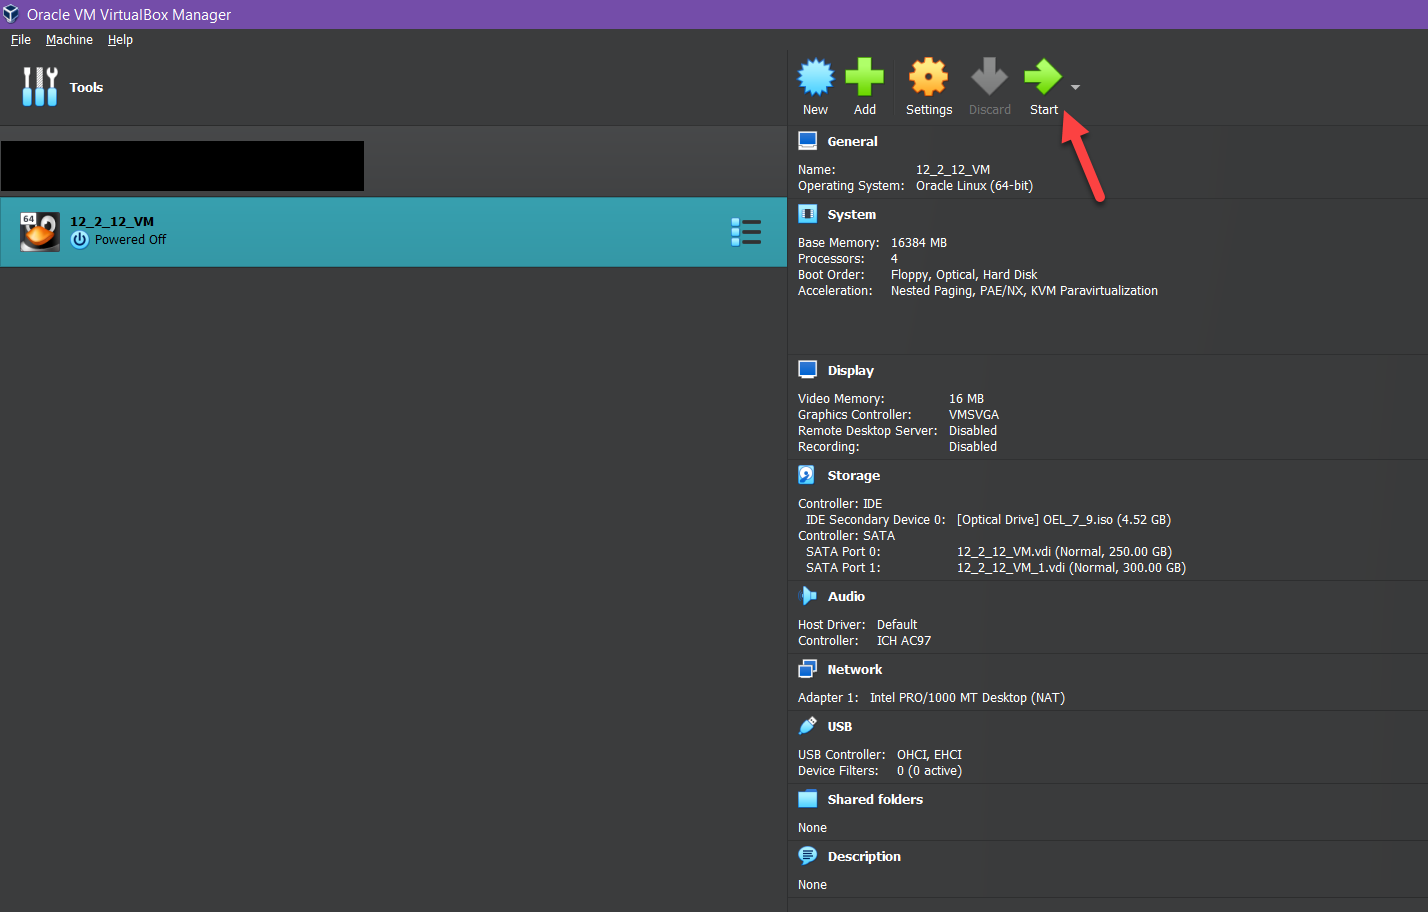
Now Start the Newly Configure VM to Install the OEL 7.9

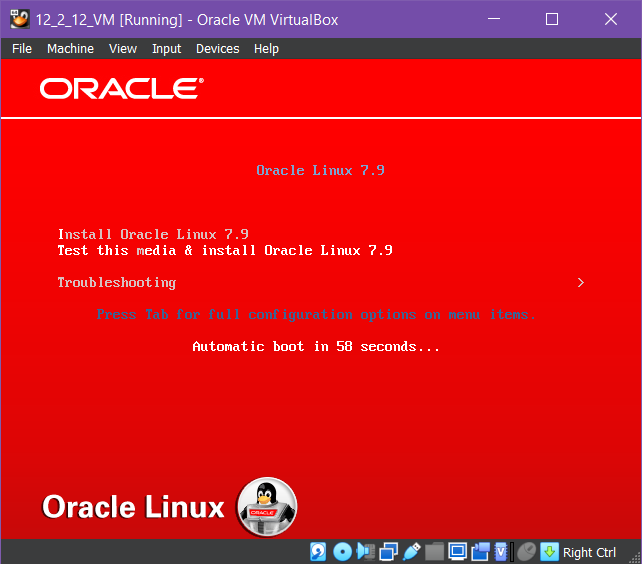
Now New Window Will Pop Up Running the Installer for OEL 7.9. 

Click in this Window and select “Install Oracle  Linux 7.9” with arrow keys on the keyboard and Press ENTER.

Oracle Enterprise Linux 7.9 Installation Process

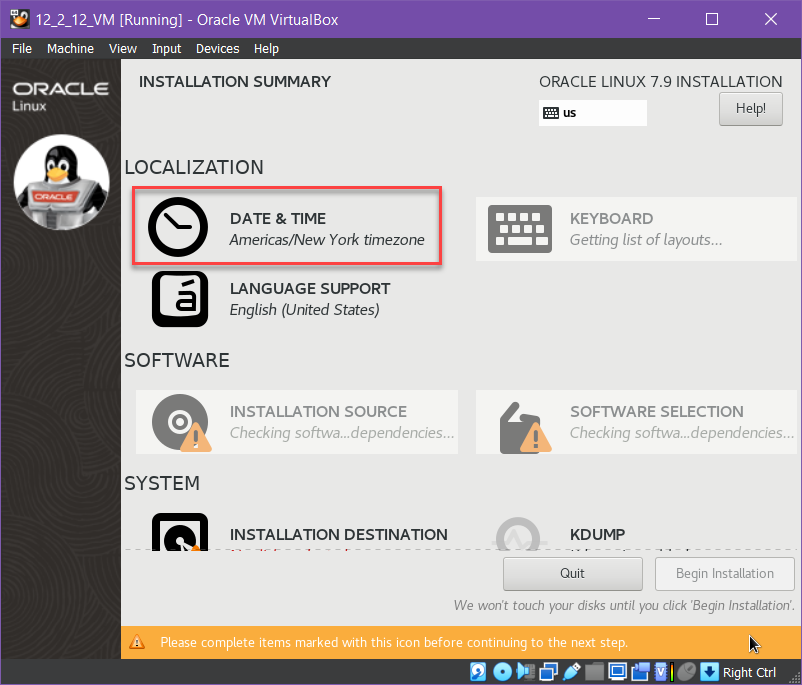
Click Continue

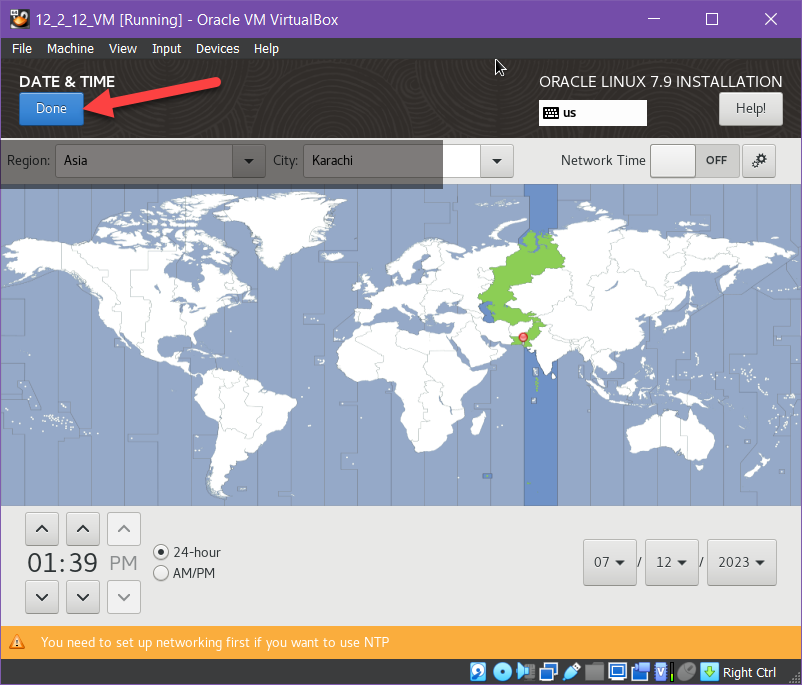
Click “DATE & TIME ” to configure Timezone

Click Done After Configuring Region Timezone

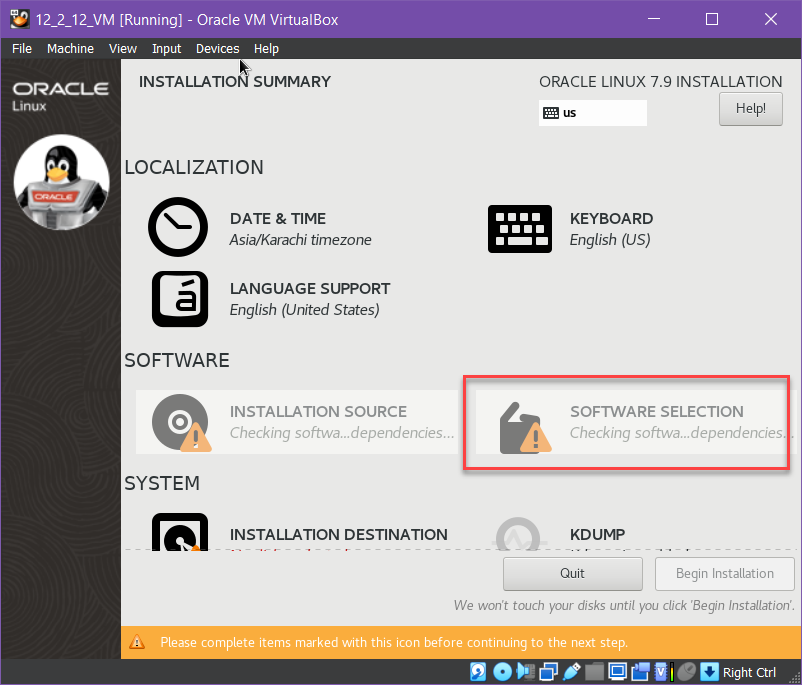
Now Click “SOFTWARE SELECTION”

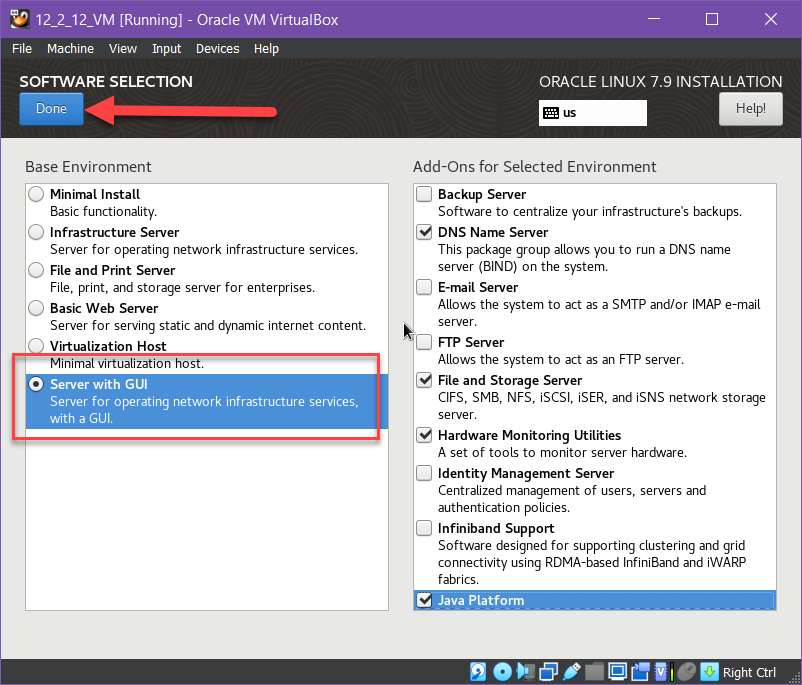
Select the Following from the List 

Base Environment

  • Server With GUI

Add-Ons For Selected Environment

  • DNS Name Server
  • FTP Server
  • File and Storage Server
  • Hardware Monitoring Utilities
  • Compatibility Libraries
  • Development Tools
  • System Administration Tools

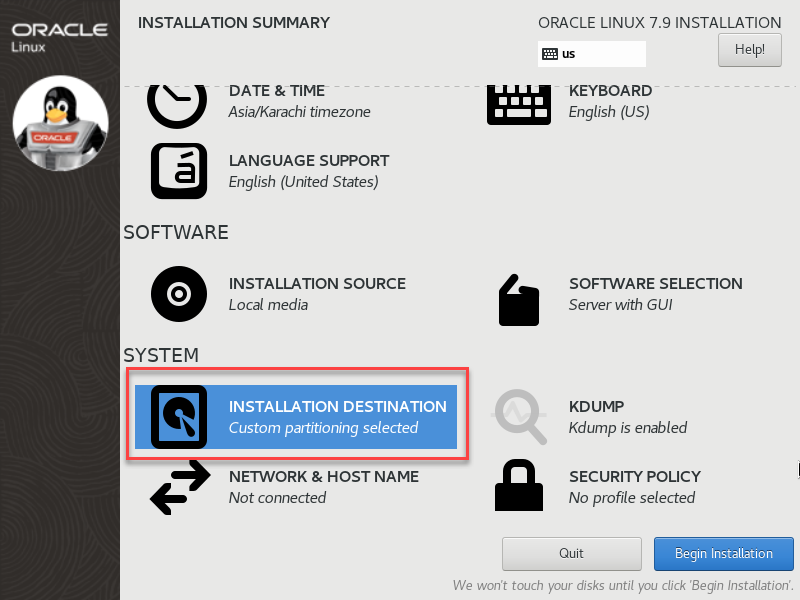
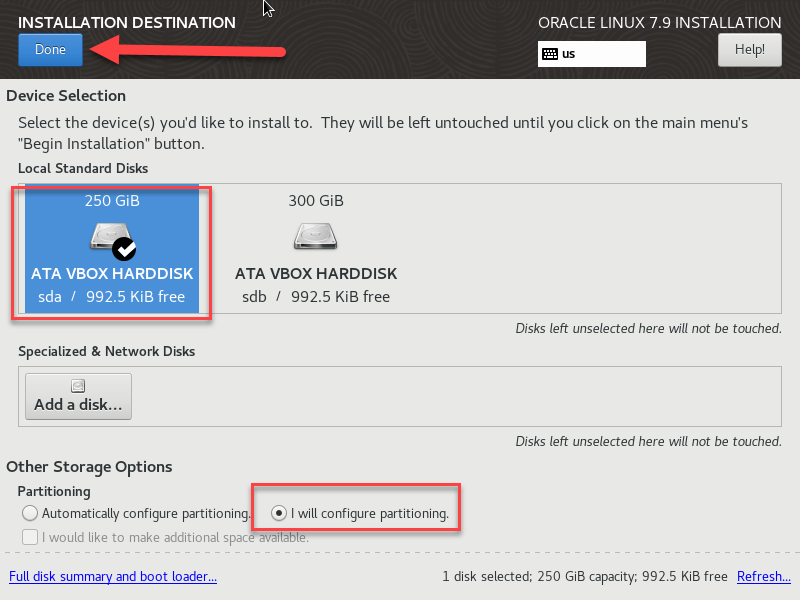
Now Click “INSTALLATION DESTINATION”

Select the following options in the picture and Click DONE to open Hard Disk Configuration

Click “Click here to create them automatically”

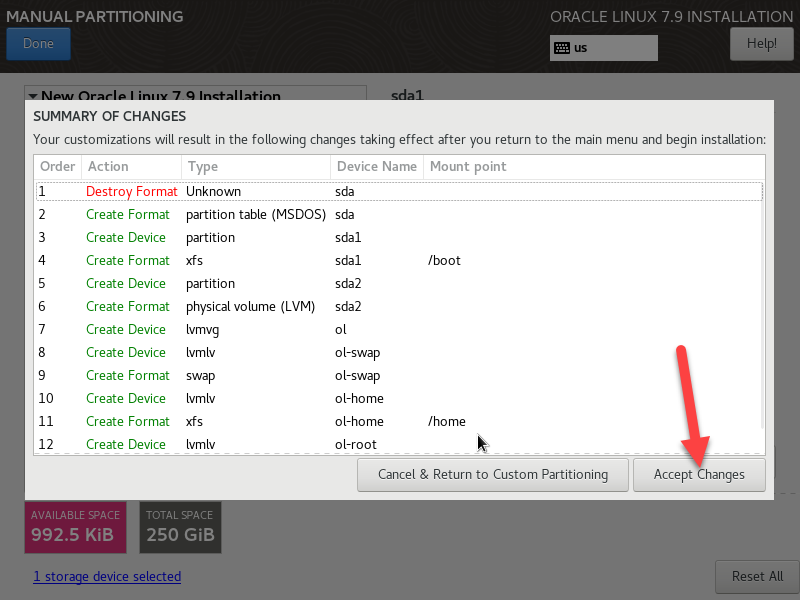
Alter the Size of the Partitions as per the picture given below  or according to your desired values and Click Done

Click “Accept Changes” to Create the Partitions

Note: We will Configure the Other added Virtual Hard Disk After OS Installation


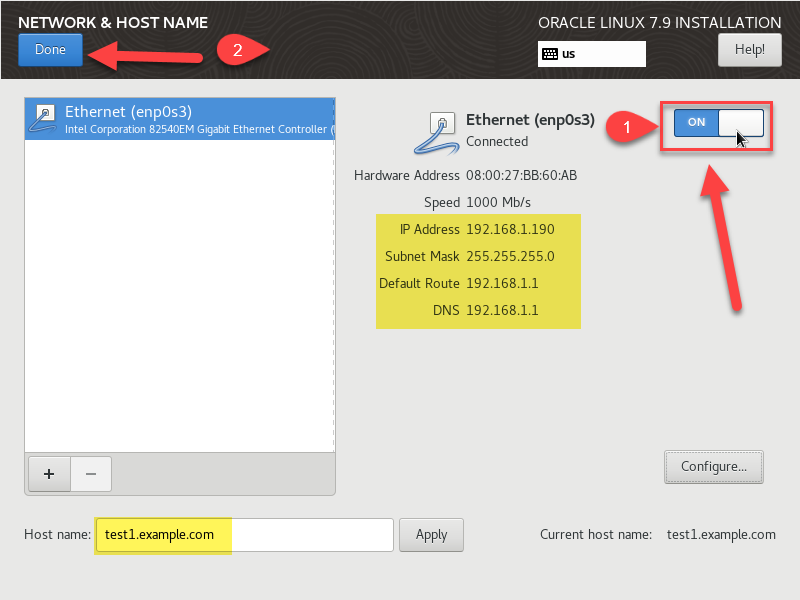
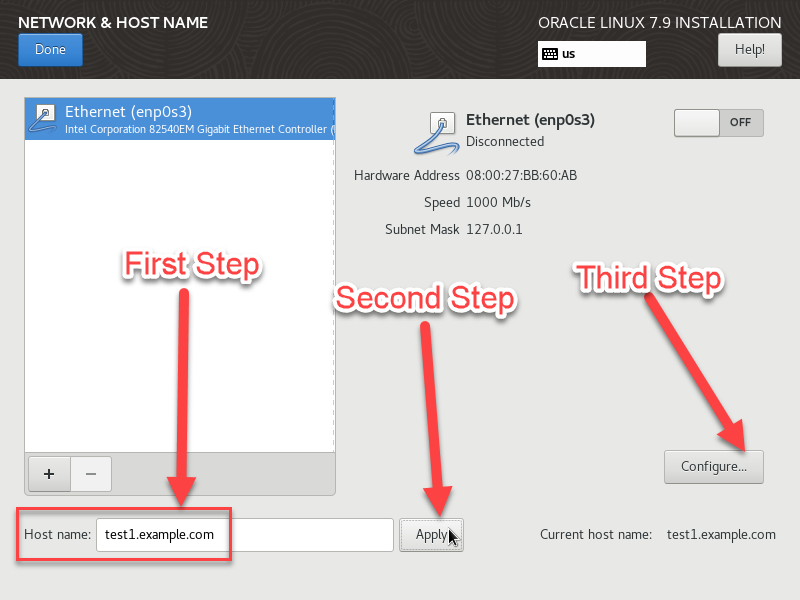
Click “NETWORK & HOST NAME” for the configuration of the Network

Enter the Required Info as given in the Picture and then Click Configure

Go to IPv4 Settings Tab and then

1: Select Manual

2: Click Add to add IP address Details

3: Add IP Address and DNS Details for Internet Connectivity.

4. Click Save

Click Ethernet to ON and Click Done

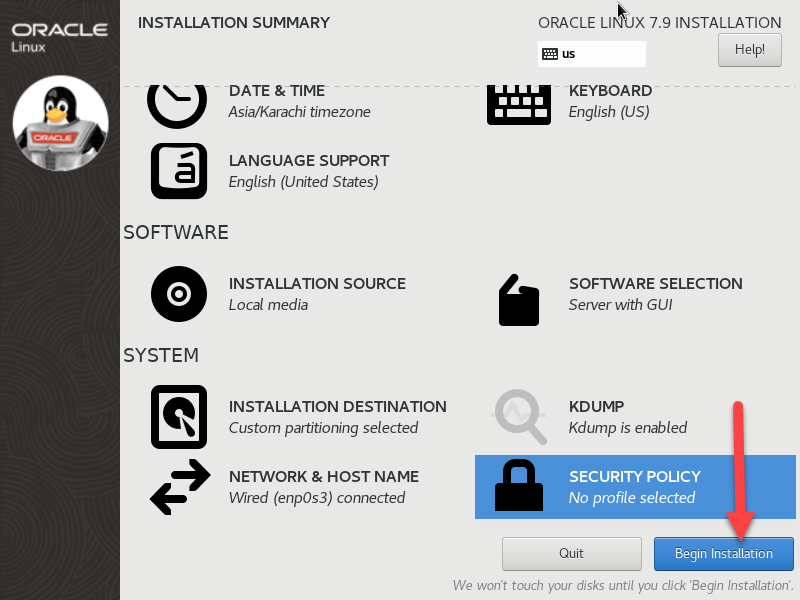
Now Click “Begin Installation” for starting the Installation Process

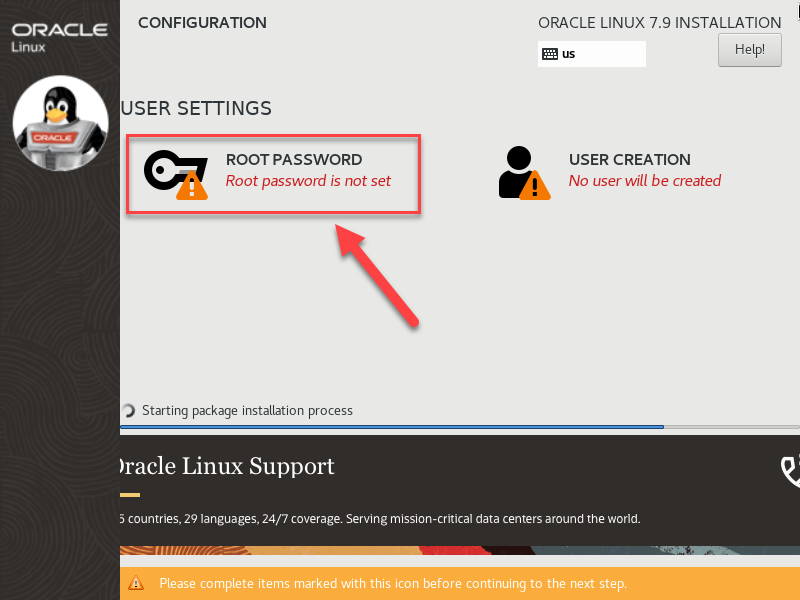
Installation Process Start, click Root Password to Set Password of ROOT User

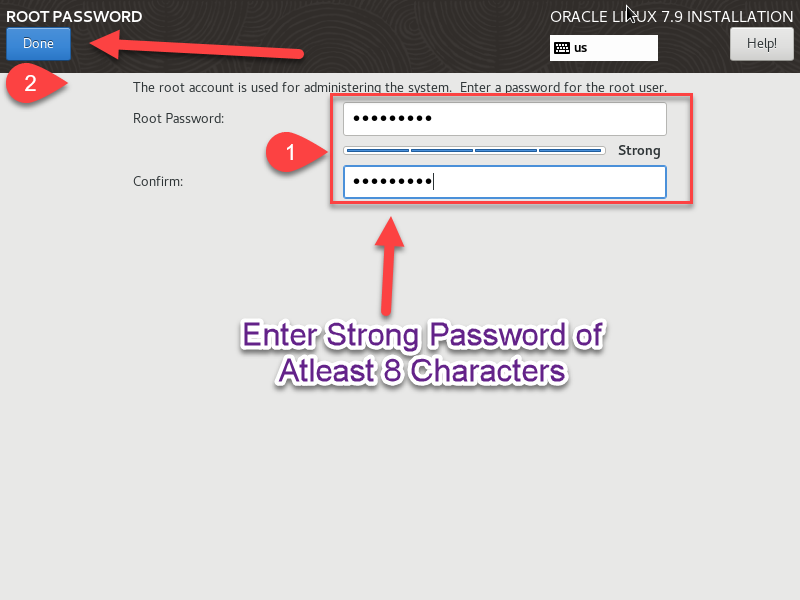
Enter the Password for ROOT User and Click Done

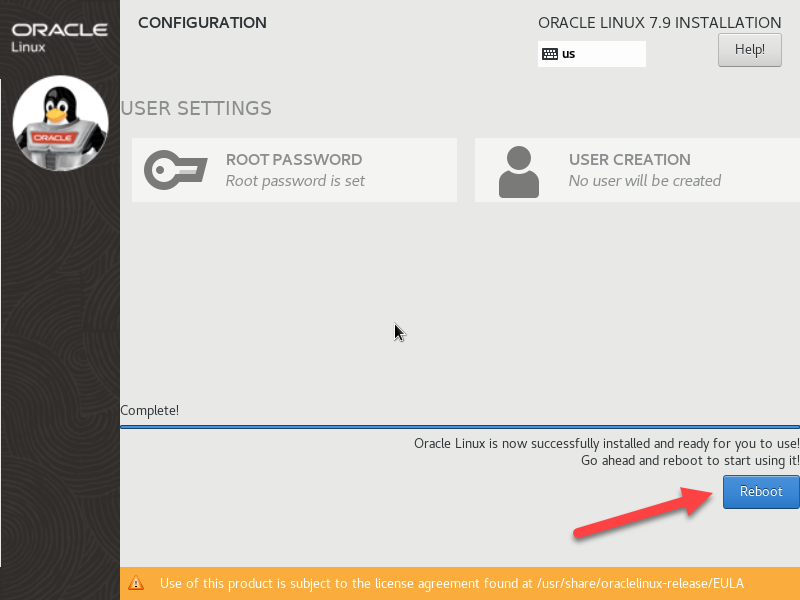
Click the Reboot Button Once the Installation Completes

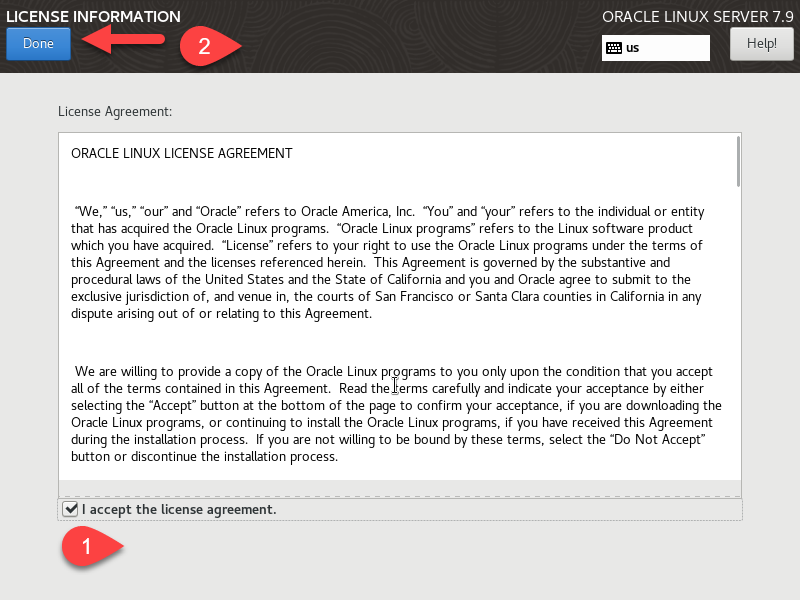
After Reboot, Click “LICENSE INFORMATION”

Accept the License and Click Done

Click “FINISH CONFIGURATION”

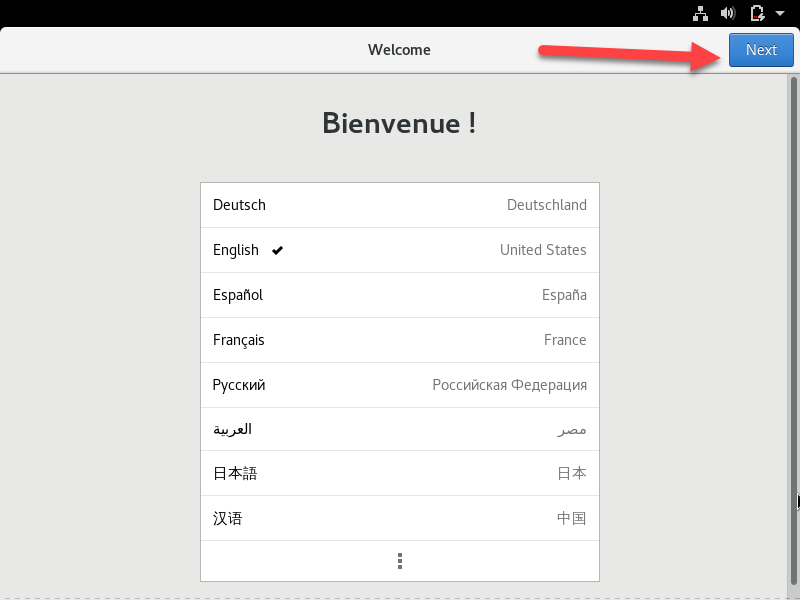
Click Next

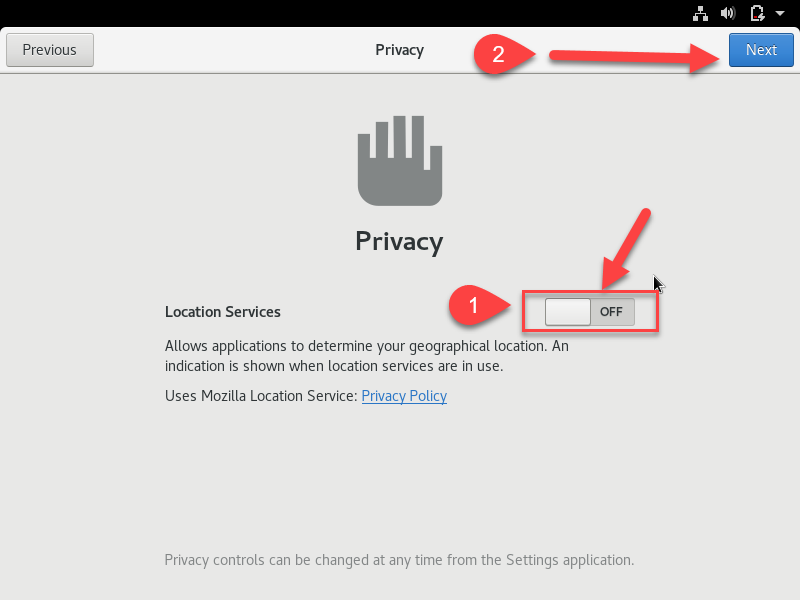
Click Next after Disabling the Location Services

Click Skip

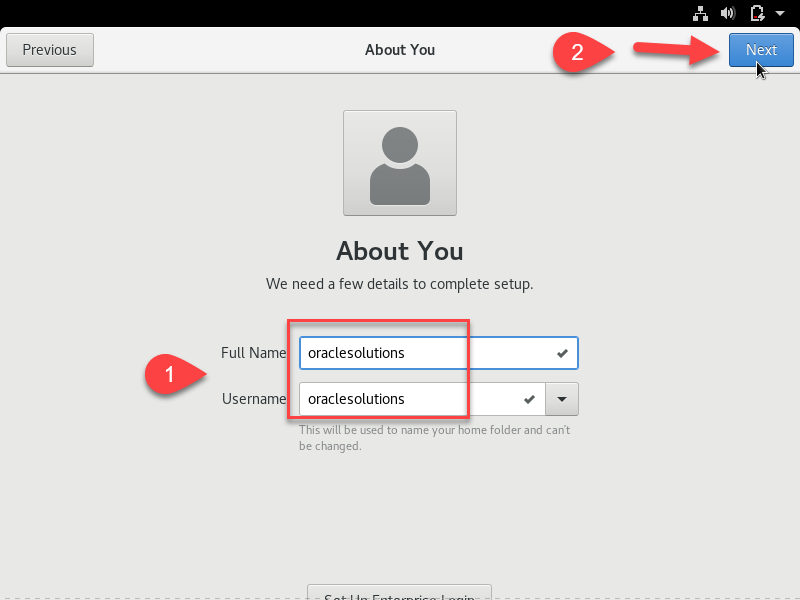
Click Next After Entering The Following Information in the Picture. This will Create an Account Other than ROOT User.

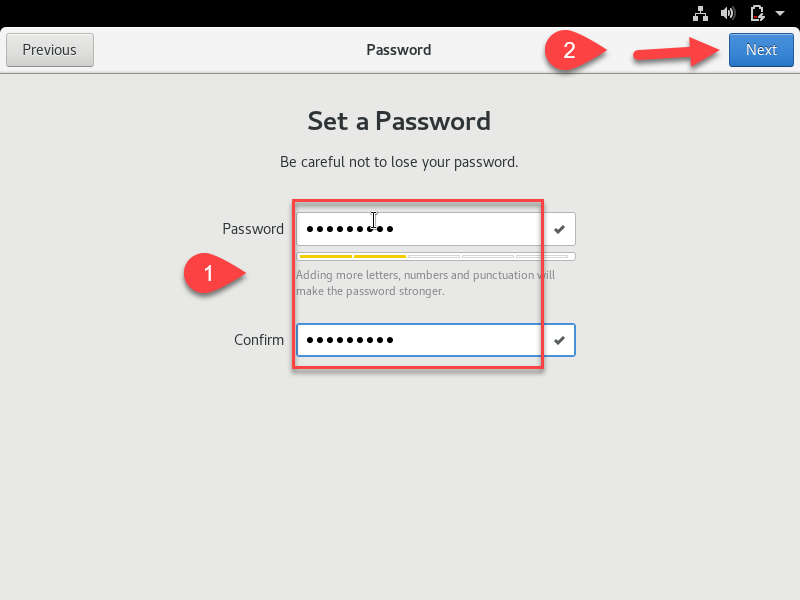
Set Password for the User and Click Next

Click “Start Using Oracle Linux Server”

Oracle Virtual Box Guest Addition RPM Installation Process

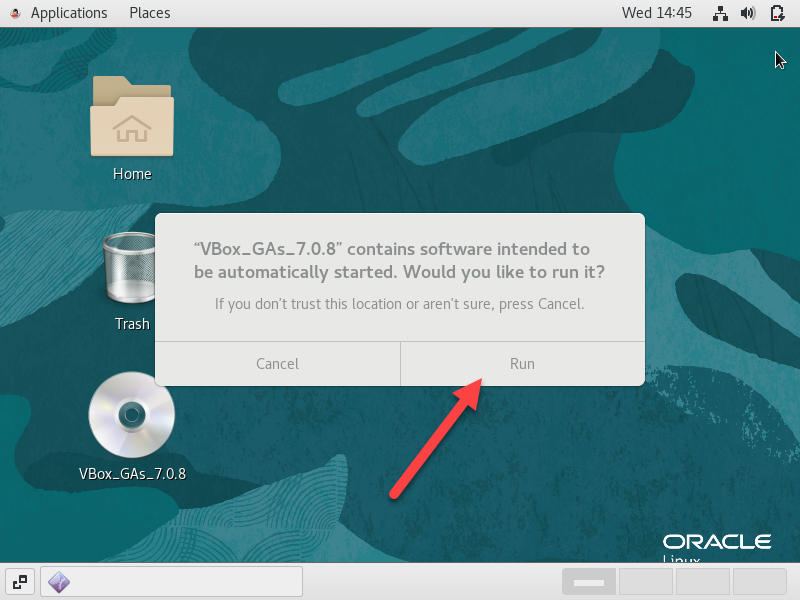
Now We will Install the Virtual Box Guest Addition RPM. For This Insert the Guest Additions CD Image as shown in the Picture 

Click Run

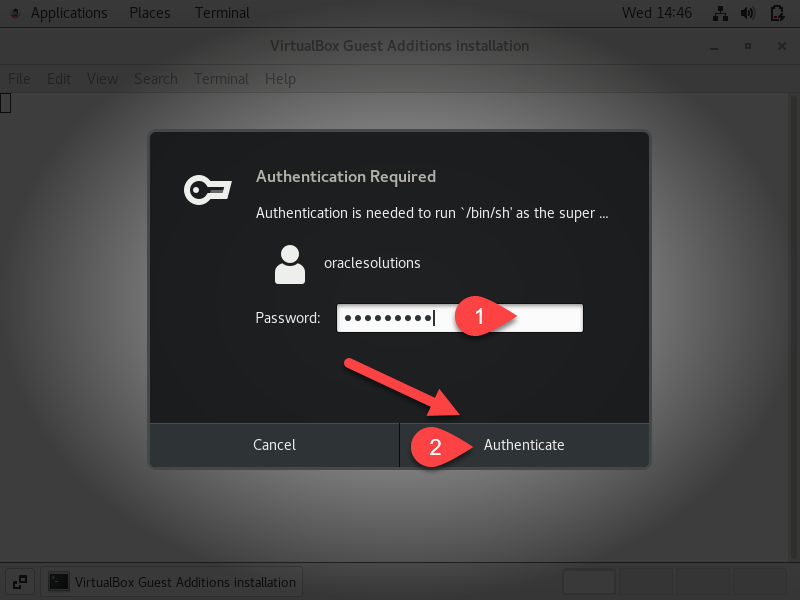
Enter The Password of the user to continue the Installation Process

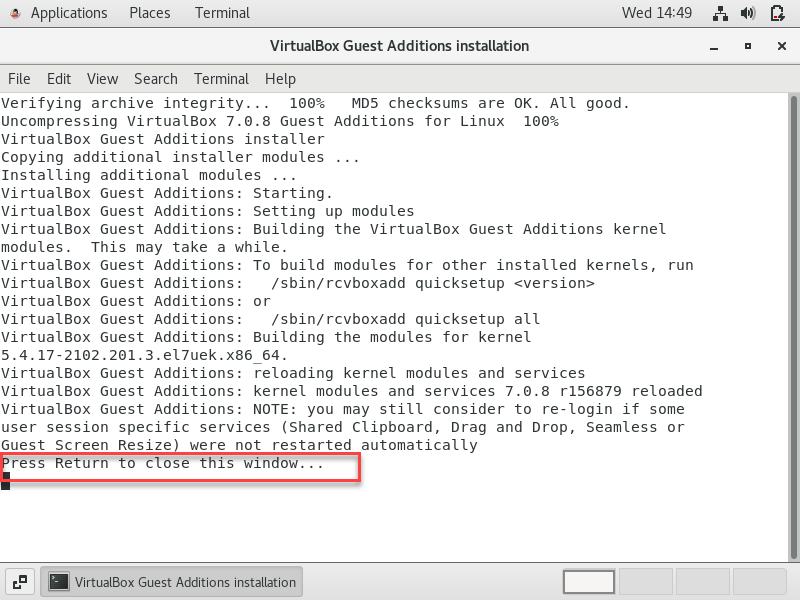
Click Enter to Close the Window.

Reboot After the installation.

Configure Another Virtual Hard Disk Process

As a reminder, during the Linux configuration on Virtual Box, we included two virtual hard disks. However, during the Linux installation process, we only configured one of the virtual hard disks. Now, it is time to configure the remaining virtual hard disk.

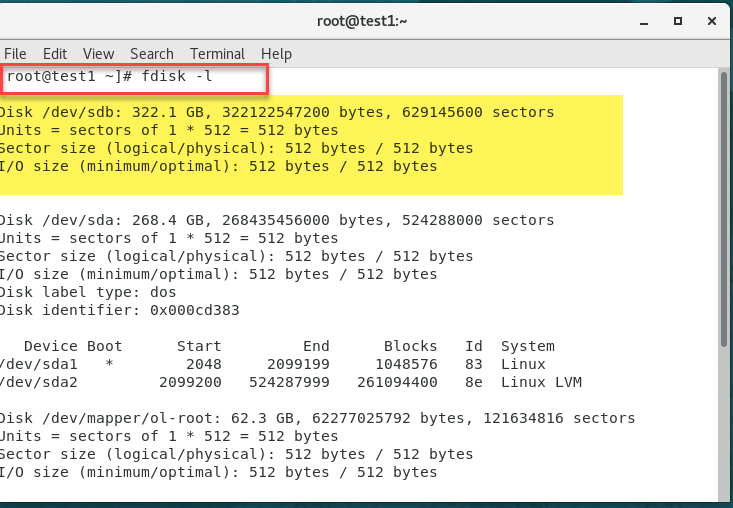
To display the available disks, open the terminal as the root user and enter the command “fdisk -l”. This will provide a list of the disks that are currently accessible.


Step 1: Format Disk To Create File System

[root@test1 ~]# fdisk /dev/sdb

Welcome to fdisk (util-linux 2.23.2).

Changes will remain in memory only, until you decide to write them.

Be careful before using the write command.

Device does not contain a recognized partition table

Building a new DOS disklabel with disk identifier 0xdc621a1b.

Command (m for help): c

DOS Compatibility flag is set (DEPRECATED!)

Command (m for help): u

Changing display/entry units to cylinders (DEPRECATED!).

Command (m for help): p

Disk /dev/sdb: 322.1 GB, 322122547200 bytes, 629145600 sectors

255 heads, 63 sectors/track, 39162 cylinders

Units = cylinders of 16065 * 512 = 8225280 bytes

Sector size (logical/physical): 512 bytes / 512 bytes

I/O size (minimum/optimal): 512 bytes / 512 bytes

Disk label type: dos

Disk identifier: 0xdc621a1b

   Device Boot      Start         End      Blocks   Id  System

Command (m for help): n

Partition type:

   p   primary (0 primary, 0 extended, 4 free)

   e   extended

Select (default p): p

Partition number (1-4, default 1): 

First cylinder (1-39162, default 1): 1

Last cylinder, +cylinders or +size{K,M,G} (1-39162, default 39162):

Using default value 39162

Partition 1 of type Linux and of size 300 GiB is set

Command (m for help): w

The partition table has been altered!

Calling ioctl() to re-read partition table.

Syncing disks.

Step 2. Create and Mount File System

[root@test1 ~]# /sbin/mkfs.ext4 -L /u01 /dev/sdb1

mke2fs 1.42.9 (28-Dec-2013)

Filesystem label=/u01

OS type: Linux

Block size=4096 (log=2)

Fragment size=4096 (log=2)

Stride=0 blocks, Stripe width=0 blocks

19660800 inodes, 78642183 blocks

3932109 blocks (5.00%) reserved for the super user

First data block=0

Maximum filesystem blocks=2227175424

2400 block groups

32768 blocks per group, 32768 fragments per group

8192 inodes per group

Superblock backups stored on blocks:

               32768, 98304, 163840, 229376, 294912, 819200, 884736, 1605632, 2654208,

               4096000, 7962624, 11239424, 20480000, 23887872, 71663616


Allocating group tables: done                            

Writing inode tables: done                           

Creating journal (32768 blocks): done

Writing superblocks and filesystem accounting information: done

[root@test1 ~]# mkdir /u01

[root@test1 ~]# mount /dev/sdb1 /u01

Now, edit the fstab file to automatically mount this partition on REBOOT.

[root@test1 ~]# vi /etc/fstab

/dev/sdb1               /u01                    ext4    defaults        1 2


Following a successful installation of Linux on Virtual Box, we can now proceed with configuring the RPM packages on the Linux system based on the specific software you intend to install.

For Configuration of Linux RPM on 7.9 for Oracle E-Business Suite 12.2, click the Below link

OEL Configuration for Oracle Apps R12.2.12


July 12, 2023 Oracle VirtualBox Installation
APPS DBA

Oracle VirtualBox Download and Installation Step By Step Process 


In this informative guide, we will walk you through the process of installing Oracle Virtual Box on the Windows operating system. Oracle Virtual Box is a feature-rich virtualization software that enables users to create and run virtual machines on their Windows-based systems. By following the steps outlined below, you will be able to download and install the latest version of Virtual Box (7.0.8) seamlessly.


Step 1. Visit the official Virtual Box website to obtain the most recent Virtual Box software compatible with Windows.

Virtual Box Download Link


Step 2. Once the download is complete, you can proceed with the installation by following these steps:

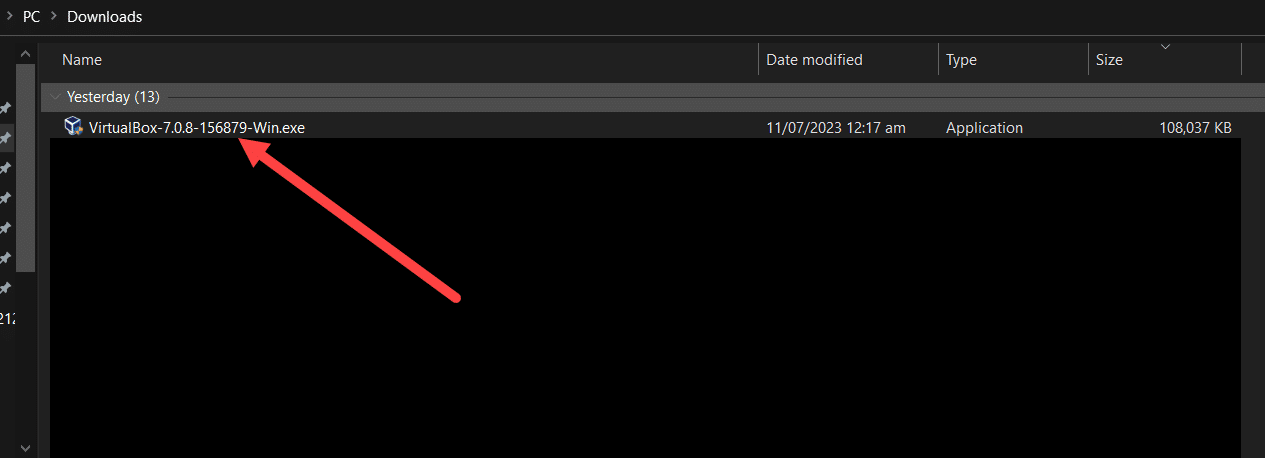
Locate the downloaded installation file (typically in the Downloads folder).

double-click on it to initiate the Oracle Virtual Box installer.

Step 3. As you can see the Setup Installer of Virtual Box Initiated, you can proceed with the Installation as Given below

now Click Next


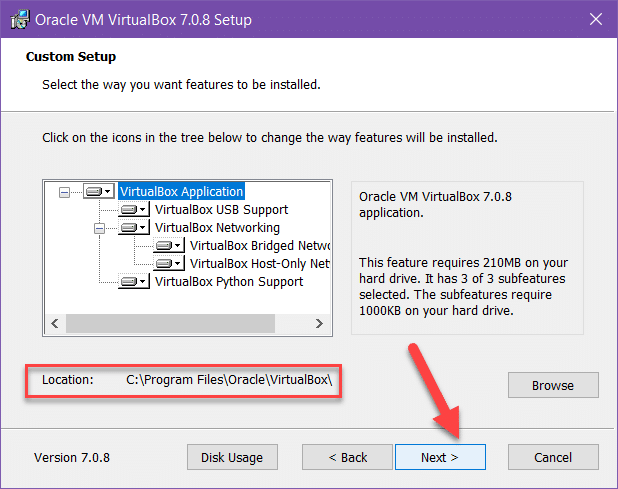
You Can Change the Location of the Software Installation, I will leave it as it is and then Click Next.

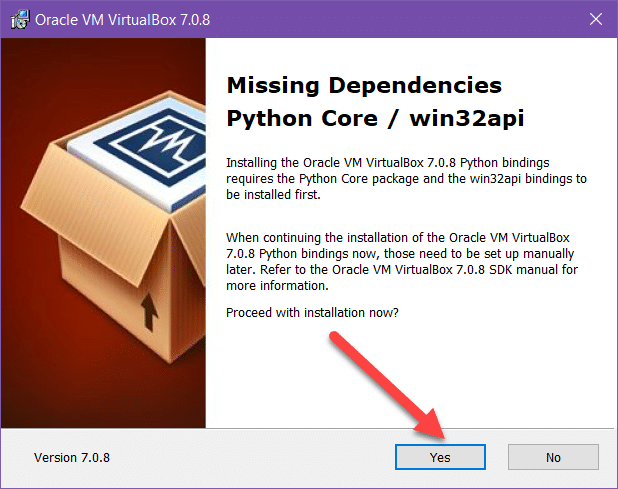
Click Yes

Click Yes

Click Install

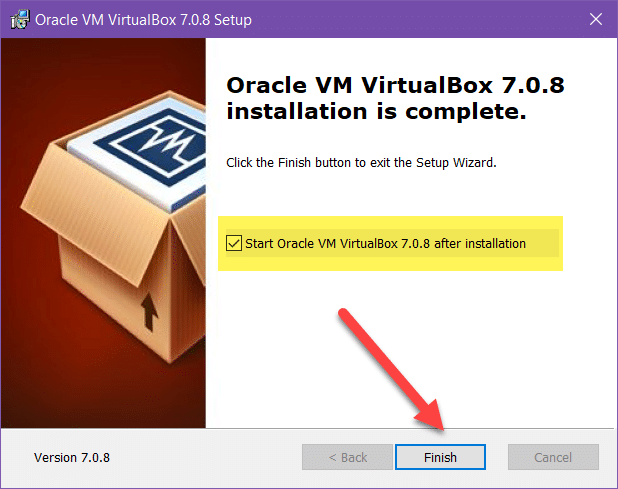
Click Finish and it will open the Virtual Box Software to Configure the Virtual Machine.


Step 4. Now Your Virtual Box Is Ready To Configure Virtual Machines

For Install Oracle Linux, you Can Use the Following Blog Post for Linux Installation

Oracle Linux Installation Link


May 22, 2023 The worker should not have status Running or Restarted
APPS DBA

AutoPatch error: The worker should not have status ‘Running’ or ‘Restarted’ at this point.

ERROR:

R12.2 ADOP:

AutoPatch error:
The worker should not have status ‘Running’ or ‘Restarted’ at this point.

Telling workers to quit…
All workers have quit.
Connecting to APPS……Connected successfully.
AutoPatch error:

Error running SQL and EXEC commands in parallel

CAUSE:

  1. The adpatch or adop process was terminated abruptly at the OS level while the patch was being applied.
  2. The database was either shut down or terminated unexpectedly.
  3. Error encountered when tried to re-start adop patch.

SOLUTION:

Step 1: Launch Adctrl and check the status of the workers. Are the workers currently running or have they been started?

Select the following options in Adctrl: 
   Option 1 to Show Worker Status then
   Option 4 to Tell manager that a worker failed its job

Step 2. Restart the ADOP patch from the following given OPTIONS.

  • If you wish to restart a failed patch from the beginning, specify the following option
adop phase=apply patches=<Patch_Number> restart=no abandon=yes
  • If you wish to restart a failed patch from where it left off, simply specify the following option

adop phase=apply patches=<Patch_Number> restart=yes abandon=no

May 20, 2023 OPMNCTL startall Fails with status 4200
APPS DBA

OPMNCTL startall Fails with unexpected exit: status 4200

When attempting to initiate the opmnctl services in E-Busines Suite R12.2, an error with the code 4200 is encountered as shown below.

Error: 

opmnctl startall: starting opmn and all managed processes… 

[opmn] [ERROR:1] [] [internal] /u01/apps/fs1/FMW_Home/webtier/opmn/bin/opmn: unexpected exit: status 4200 

opmnctl startall: opmn failed to start. 


Reason:

The inability of OPMN and OHS to start is attributed to the default wallets generated by Oracle Fusion Middleware, which include self-signed certificates signed using md5WithRSA. However, the updated security library no longer supports certificates signed by md5WithRSA. To resolve this issue, the certificate signature algorithm must be sha256WithRSA or a more advanced algorithm.
 

FIX:

By following the below steps, you can generate a new wallet that includes a self-signed certificate meeting the required standards. Subsequently, you can deploy this wallet to the default locations, enabling the successful startup of OHS and OPMN.
 
 
Step 1: Begin by logging in as the user responsible for the application tier installation. Then, access the run file system environment and the $FMW_HOME/SetWebtier.env  file
 
$ source <EBS base install directory>/EBSapps.env run 
$ source $FMW_HOME/SetWebtier.env 
 
Step 2: Proceed with setting an alias for the appropriate orapki command.
 
$ alias orapki=$FMW_HOME/oracle_common/bin/orapki 
 
Step 3: In the third step, generate a new wallet with an acceptable self-signed certificate in the directory $HOME/ss  Here’s an example:
 
$ mkdir ~/ss 
$ cd ~/ss 
$ orapki wallet create -wallet ./ -auto_login_only 
$ orapki wallet add -wallet . -dn "CN=FMWSmallCircleOfTrust" -asym_alg RSA -keysize 2048 -sign_alg sha256 -self_signed -validity 3652 -auto_login_only 
$ orapki wallet display -wallet . 
 

To ensure the successful creation of the wallet, you can use the final command (orapki wallet display -wallet .) to verify its status.

Step 4: In the fourth step, identify the instanceName of the current environment and save it as an environment variable for future reference.
 
tr < $CONTEXT_FILE '<>' '  ' | awk '/"s_ohs_instance"/ {print $(NF-1)}' 
EBS_web_OHS1 
iName=$(tr < $CONTEXT_FILE '<>' '  ' | awk '/"s_ohs_instance"/ {print $(NF-1)}' ) 
 
Step  5: Proceed to navigate to the instance directory as part of the fifth step.
 
$ cd $FMW_HOME/webtier/instances/$iName
 

Locate the default wallets utilized by this instance.

$ find . -name cwallet.sso | fgrep -v /webgate/ 
./config/OPMN/opmn/wallet/cwallet.sso 
./config/OHS/EBS_web/proxy-wallet/cwallet.sso 
./config/OHS/EBS_web/keystores/default/cwallet.sso 
 
Step  6: As part of the sixth step, ensure that each wallet solely consists of the self-signed certificate for verification purposes.
 
$ find . -name cwallet.sso | fgrep -v /webgate/ | while read w ; do echo -e "n$w"; orapki wallet display -nologo -wallet $w ; done 
 

For default wallets, confirm that each wallet exhibits a single “User Certificate” and a matching “Trusted Certificate.” Refer to the following example for clarification:

./config/OPMN/opmn/wallet/cwallet.sso 
Requested Certificates: 
User Certificates: 
Subject: CN=Self-Signed Certificate for EBS_web_OHS120,OU=OAS,O=ORACLE,L=REDWOODSHORES,ST=CA,C=US 
Trusted Certificates: 
Subject: CN=Self-Signed Certificate for EBS_web_OHS120,OU=OAS,O=ORACLE,L=REDWOODSHORES,ST=CA,C=US 
 
Note: Please note that if a wallet is not a default wallet, it is advisable to create a backup copy of the wallet before proceeding further. 
 
Step  7:  Duplicate the newly created wallet with a SHA-256 signature and place it in all the designated default wallet locations
 
$ find . -name cwallet.sso | fgrep -v /webgate/ | while read w ; do echo $w; cp -p ~/ss/cwallet.sso $w ; done 
 

By completing the aforementioned step, you have successfully copied the newly generated self-signed wallet to the default locations within the run file system. This approach eliminates the need to modify the OPMN and OHS configuration files to reference an alternative wallet or wallet directory.

 
Step  8: In preparation for implementing the changes to the patch file system, proceed with the modification of the adop_sync.drv file located in $APPL_TOP_NE/ad/custom. Include the following updates:
 
#Oracle HTTP Server Wallet - cwallet.sso 
rsync -zr %s_current_base%/FMW_Home/webtier/instances/%s_ohs_instance%/config/OHS/%s_ohs_component%/keystores/default/cwallet.sso %s_other_base%/FMW_Home/webtier/instances/%s_ohs_instance%/config/OHS/%s_ohs_component%/keystores/default/cwallet.sso 
#OPMN Wallet - cwallet.sso 
rsync -zr %s_current_base%/FMW_Home/webtier/instances/%s_ohs_instance%/config/OPMN/opmn/wallet/cwallet.sso %s_other_base%/FMW_Home/webtier/instances/%s_ohs_instance%/config/OPMN/opmn/wallet/cwallet.sso 
rsync -zr %s_current_base%/FMW_Home/webtier/instances/%s_ohs_instance%/config/OHS/%s_ohs_component%/proxy-wallet/cwallet.sso %s_other_base%/FMW_Home/webtier/instances/%s_ohs_instance%/config/OHS/%s_ohs_component%/proxy-wallet/cwallet.sso 
 
Once you execute the steps outlined in Section 4 during the prepare phase (adop phase=prepare) of the online patching process, the aforementioned changes will be applied to the patch file system. These changes will come into effect following a successful cutover (adop phase=cutover).
 
Once you have completed this procedure, it is important to refrain from removing or modifying the updated adop_sync.drv file.
 
Step 9: Proceed with the re-registration of OHS if it is deemed necessary.
 
Retrieve the host, port, and user name variables for WLS Admin from CONTEXT_FILE.
 
$ aHost=$( tr < $CONTEXT_FILE '<>' '  ' | awk '/"s_wls_admin_host"/ {print $(NF-1)}' ) 
$ aPort=$( tr < $CONTEXT_FILE '<>' '  ' | awk '/"s_wls_adminport"/ {print $(NF-1)}' ) 
$ aUser=$( tr < $CONTEXT_FILE '<>' '  ' | awk '/"s_wls_admin_user"/ {print $(NF-1)}' ) 
 
Perform the re-registration of OHS by executing the following commands:
 
$ cd $FMW_HOME/webtier/instances/$iName/bin 
$ ./opmnctl unregisterinstance -adminHost $aHost -adminPort $aPort -adminUsername $aUser -instanceName $iName 
$ ./opmnctl registerinstance -adminHost $aHost -adminPort $aPort -adminUsername $aUser 
 

Once the new wallet is in place, OPMN and OHS should be able to initiate successfully.

To verify the startup of only OPMN and OHS, you can utilize the commands adopmnctl.sh start and adapcctl.sh start.

Alternatively, you have the option to execute adstrtal.sh, which will attempt to start all components simultaneously.


May 16, 2023 Rename Datafile In Oracle Standby on New Location
Errors/Workarounds19c

Rename Datafile In Oracle Standby on New Location

Recently, I encountered a situation while working for a customer where there was a space constraint on the DR server. Unfortunately, we were unable to allocate additional space. However, some directories had approximately 90GB of available free space. To resolve this issue, I came up with a solution to rename the data file and move it to a new mount that had sufficient space. The process of renaming a data file on a standby database is relatively straightforward.

 
Step 1: Terminate the managed recovery process and transition the physical standby database to the mount state.
 
SQL> Alter database recover managed standby database cancel;
SQL> shutdown immediate
SQL> startup mount
 
Step 2: Now, Modify the value of the standby_file_management parameter to MANUAL. By default, this parameter is set to AUTO, which results in the automatic addition of standby datafiles whenever a datafile is added in the primary database.
 
SQL> alter system set standby_file_management=MANUAL;
 
Step 3: Relocate the datafile to a new location using the appropriate OS command. Since I am operating in the 19c environment, I have the capability to perform the move online, ensuring uninterrupted accessibility.
 
ALTER DATABASE MOVE DATAFILE '/u01/oracle/db/UATDB/APEX002.dbf' TO '/u20/oracle/db/UATDB/APEX002.dbf';
 
Step 4: Restore the standby_file_management parameter back to its default setting of AUTO.
 
SQL> alter system set standby_file_management=AUTO;
 

Step 5: Resume the managed recovery process that was halted in Step 1.

 
SQL> Alter database recover managed standby database using current logfile disconnect;


May 14, 2023 Steps to change password for APPS in EBS R12.2
APPS DBA

Steps to change password for APPS in EBS R12.2

Today, we will delve into the process of changing the EBS APPS password in Oracle E-Business Suite R12.2. While this is a routine and fundamental task for every appsdba, it is essential to perform the steps cautiously to avoid any potential risks or unforeseen complications.

Lets see the Defination of The Administrative Schema APPS, APPLSYS, APPLSYSPUB in Oracle E-Business Suite 

What is the Apps Schema?

The Apps schema refers to a schema that does not contain any tables of its own. It serves as the shared runtime schema for all E-Business Suite products. It includes synonyms for all tables in Oracle apps and also consists of packages, functions, and procedures. The default password for this schema is “apps.”

What is the Applsys Schema?

The Applsys schema comprises all the necessary tables for administrative purposes. The default password for this schema is also “apps.” It consolidates the database objects of various technical products into a single schema called Applsys.

What is the Applsyspub Schema?

The Applsyspub schema primarily handles password checking. Its default password is “pub.” Applsyspub is utilized for authentication through read-only views.

Why should the Apps and Applsys passwords always be the same?

The requirement for having the same password for both the Apps and Applsys schemas is due to the authentication process. When signing on to Apps, it initially connects to a public schema named APPLSYSPUB. This schema validates the AOL username and password entered, typically using the guest user account (operations/welcome). Once this authentication is confirmed, selecting a responsibility triggers validation by the APPLSYS schema, followed by the connection to the APPS schema.

[edsanimate_start entry_animation_type= “fadeIn” entry_delay= “0” entry_duration= “2.5” entry_timing= “linear” exit_animation_type= “” exit_delay= “” exit_duration= “” exit_timing= “” animation_repeat= “infinite” keep= “yes” animate_on= “load” scroll_offset= “” custom_css_class= “”]

NOTE: It is crucial to take backups of the following tables before proceeding with the password change for the APPS, APPLSYS, and APPS_NE users:

  1. FND_USER
  2. FND_ORACLE_USERID


[edsanimate_end]

Step 1. Taking backup to FND Tables

SQL> create table FND_USER_140523 as select * from FND_USER ;

Table created.

SQL> create table FND_ORACLE_USERID_140523 as select * from FND_ORACLE_USERID ;

Table created.

Step 2. Shutdown the EBS Application

Invoke application environment from the Run File System which in our case is of fs2
[applmgr@ebslive PROD]$ cd /u01/app/PROD/fs2/EBSapps/appl

[applmgr@ebslive PROD]$ . APPSPROD_uat.env

[applmgr@ebslive sql]$ cd $ADMIN_SCRIPTS_HOME

[applmgr@ebslive scripts]$ adstpall.sh

Step 3. To modify the password for the APPLSYS user, there are two available approaches to choose from.

A. FNDCPASS:

Use the below syntax:

FNDCPASS <logon> 0 Y <SYSTEM username>/<SYSTEM password> SYSTEM APPLSYS <new_password>

For example, the following command changes the APPLSYS password to ‘WELCOME’:

FNDCPASS apps/<appspwd> 0 Y system/manager SYSTEM APPLSYS WELCOME
 

B. AFPASSWD

In this case, we will utilize the AFPASSWD utility to update the password.

syntax:- AFPASSWD [-c <APPSUSER>[@<TWO_TASK>]] -s <APPLSYS>

[applmgr@ebslive appl]$ AFPASSWD -c apps@PROD -s APPLSYS

Enter the ORACLE password of Application Object Library 'APPSUSER':

Connected successfully to APPS.

Enter the password for your 'SYSTEM' ORACLE schema:

Connected successfully to SYSTEM.

Log file: AFPWD_PROD_433423.log

Enter new password for user:

Verify new password for user:

AFPASSWD completed successfully.

Step 4. Execute the autoconfig command on the AppsTier, ensuring that the recently updated password for the app’s user is taken into account.

[applmgr@ebslive PROD]$ cd /u01/app/PROD/fs2/EBSapps/appl

[applmgr@ebslive PROD]$ . APPSPROD_uat.env

[applmgr@ebslive scripts]$ cd $ADMIN_SCRIPTS_HOME

[applmgr@ebslive scripts]$ adautocfg.sh

AutoConfig completed successfully.

Step 5. Proceed to start the WebLogic admin server by utilizing the following script.

[applmgr@ebslive scripts]$ cd $ADMIN_SCRIPTS_HOME
[applmgr@ebslive scripts]$ pwd
/u01/app/PROD/fs2/inst/apps/PROD_uat/admin/scripts
[applmgr@ebslive scripts]$ sh adadminsrvctl.sh start

You are running adadminsrvctl.sh version 120.10.12020000.2

Enter the WebLogic Admin password:

Enter the APPS Schema password:

Step 6. Confirm the Status of Admin server

[applmgr@ebslive scripts]$ sh adadminsrvctl.sh status


Step 7: Modifying the Password in WebLogic

A) If your EBS R12.2 AD TXK Delta is 7 or higher, you should follow the subsequent steps.

[applmgr@ebslive scripts] $perl $FND_TOP/patch/115/bin/txkManageDBConnectionPool.pl
Please select from list of valid options
        updateDSPassword - Update WebLogic Datasource Password
        updateDSJdbcUrl  - Update WebLogic Datasource Connection String
Enter Your Choice : updateDSPassword
Enter the full path of Applications Context File [DEFAULT -]:
Enter weblogic admin server password: <enter Weblogic Password>
Enter the APPS user password: <enter New APPS Password>

B) If your EBS R12.2 AD TXK Delta is lower than 7, you should utilize the following steps.

  1. Access the WebLogic console through a web browser.
  2. Click on the “Lock and Edit” button.
  3. Navigate to the “Domain structure” section and select “Services” -> “Data Sources.”
  4. Locate and select the “EBSDataSource” entry.
  5. In the “Settings of EBSDataSource” page, go to the connection pool section.
  6. Enter the updated password for the apps user and save the changes.
  7. Finally, click on “Activate changes” to apply the modifications.


Step 8 . Start the application services.

[applmgr@ebslive appl]$ pwd

  /u01/app/PROD/fs2/EBSapps/appl

[applmgr@ebslive appl]$ adstrtal.sh

 You are running adstrtal.sh version 120.24.12020000.6

 Enter the APPS username: apps 

 Enter the APPS password:

 Enter the WebLogic Server password:

 All enabled services for this node are started.

 adstrtal.sh: Exiting with status 0


Step 9: Validate WLS Datastore Modifications by Following These Steps

  1. Access the WLS Administration Console and log in.
  2. In the Domain Structure tree, expand the “Services” section, then choose “Data Sources.”
  3. Locate and select “EBSDataSource” on the “Summary of JDBC Data Sources” page.
  4. Navigate to the “Settings for EBSDataSource” page and select “Monitoring” followed by “Testing.”
  5. Select “oacore_server1” from the available options.
  6. Click on “Test DataSource.”
  7. Look for the confirmation message stating “Test of EBSDataSource on server oacore_server1 was successful.”
  8. If Integrated SOA Gateway (ISG) is implemented, repeat the steps for “OAEADataSource”. Verify “oafm_cluster*” managed servers are started successfully.


Contact

Get in Touch
  • Address: Karachi, PAKISTAN
  • Email: askme@SyedSaadAli.com
  • Phone: +92-300-026-5668
  • Freelance: Available
Contact Form